If you are eyeing the Annapurna Circuit trek, that epic loop around Nepal’s stunning Annapurna Massif, then you should know that it is not just about views. It is about getting from one point to another without a hitch. And that’s where the role of the map comes in.
A solid Annapurna Circuit Trek map is your silent partner in the journey that helps you navigate the trails that pass from lush valleys to barren high passes.
The trek of the Annapurna Circuit requires you to navigate 160 to 230 kilometers of trail. This includes elevations soaring from the comfortable 1,860 meters in Dharapani to the difficult 5,416 meters in Thorong La Pass. But one wrong turn along the trail and you could be deterring into a landslide zone. Or you may miss the best viewpoint of the entire trek. In such situations, you are on the right track if you are accompanied by the Annapurna Circuit Trek route map.
Maps have evolved a lot since trekking first gained popularity in the 1970s in Nepal. Today, you have got choices. There are print versions of the map for that tactical feel. Digital apps of the trek map of the Annapurna Circuit are interesting as they let you zoom in on the details. Then, there are offline setups that keep you going when internet connection is a distant thing.
But to ensure that the map comes in handy, you need to know how to pick, use and rely on it. Whether you are a solo trekker or part of a group, the map of Annapurna Circuit Trek is essential to break down routes and follow the right track. Being well-versed in using the map makes you feel like you have the Himalayas in your pocket.
Highlights
- The trek map is essential to navigate the 160-230 km Annapurna Circuit trail through diverse landscapes
- It makes trekkers aware of elevation, which helps in managing altitude shifts
- One can choose between print and digital maps or use a combination of both
- A static image or route map is useful for a quick and clear reference of the trek trail
- Emergency exits, helipads and health posts mentioned in the map are useful for evacuation and medical care if required
Why Use the Annapurna Circuit Trek Map
The map of the Annapurna Circuit in your hand or on your phone is more than lines and dots. It is a roadmap to your unforgettable Himalayan adventure. The Annapurna Circuit Trek map is packed with details of the trails to make your journey smoother.
Here is why you need to have the map of Annapurna Circuit Trek ready before starting the journey:
Planning for Navigation
The Annapurna Circuit Trek map is essential to identify the route and then to break it down into daily segments. For instance, Day 4 from Dharapani (1,860m) to Chame (2,670m) covers around 16 km with an elevation gain of 810m. This knowledge helps you plan your trek for the day, keeping in mind easy and difficult sections, rest points and major landmarks along the route.
Most importantly, it becomes easier to navigate the trail if you refer to the map. You know which direction to follow. It also keeps you on the right track, along with letting you spot where the suspension bridges are. You can estimate how far your destination for the day is. All these things help you plan your daily hikes and allow you to complete the trek comfortably without getting lost.
Are you planning trekking in Nepal? Do you need any information? Let us know via form below, we are happy to help.
Safety and Emergency Exits
Maps highlight escape routes in case of emergency, along with highlighting evacuation spots. This knowledge is key to unpredictable weather.
Look for a helipad in Jomsom (2,720 m) or a health post in Manang (3,540 m), marked with H icons in blue and red, respectively. Evacuation? Jomsom airport is a lifesaver for flights out if altitude hits hard. And it is the Annapurna Circuit Trek route map that helps you identify these places.
In poor visibility, you can look at the map to stick to the marked trails to prevent being lost in places like the Thorong La Pass. Likewise, landmarks like suspension bridges or mani walls act as checkpoints. It means if you are lost, you can backtrack to the last teahouse. Once again, your map guides you during such confusion. Note shaded hazard zones for landslides that are common in monsoons.
Readying for Accimatization and Fitness
The data on elevation is your best friend against altitude sickness. And that information is available on the Annapurna Circuit Trek route map. Referring to the map, you can plan for rest days where the elevation gain spikes.
For instance, you can take a rest day upon reaching Manang at an altitude of 3,540 m. Then, your map shows nearby hiking destinations where you can go for acclimatization. Ice Lake at an altitude of 4,600 m could be that option.
In a similar manner, you can check elevation profiles in the map to determine how much effort you require depending on your fitness level. The push to Thorong La Pass is around 1,000 m, and this steep ascent demands preparatory hikes before beginning the trek.
Cultural and Scenic Appreciation
The map of Annapurna Circuit Trek allows you to pinpoint landmarks along the trail. As a result, you know exactly where you can enjoy the cultural and scenic features of the region. The religious sites are marked on the map. So when you refer to the map, you know that monasteries in Braga or the Muktinath Temple offer serene stops. You can plan to visit them during descents.
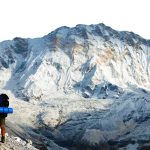
Likewise, for scenery, there are icons identifying panoramic spots, like Pisang’s upper trail for the views of Annapurna II. Or opt for Poonhill to watch the magic of sunrise. You can also use maps for side trips, like a detour to Gangapurna Glacier for photos.
Types of Maps
Different versions of the Annapurna Circuit Trek map are available to aid the trekkers in their journey. There are print maps along with digital and offline maps as well. Are you thinking which map to go with? There is no one-size-fits-all. Each of them is convenient in its own way and has its unique purpose.
Print Maps
They are the classics, the ones that you can spread out on a teahouse table and mark up with your pencil. Print versions usually fit in your pocket and are waterproof. Most often, publishers like Nepal Map Publisher or Himalayan Map House, as well as others, create such maps with a scale of 1:50,000. As such, they are detailed but without overwhelming you with too much information.
If you choose to travel with Radiant Treks, we provide you with such maps. Other than that, you can get them in Thamel, a hub for backpackers in Kathmandu, after paying a certain fee. Such versions are great for group planning.
The only downside is that they can rip if you are not careful. Also, as the updates are not automatic. Thus, get the latest edition so that you are aware of changes like road extensions in Manang or others that have happened in the route areas in recent days.
Digital Maps
Digital maps have exploded in popularity in recent days. They are accessible via apps like Maps.me, Gaia GPS, AllTrails and OsmAnd among others. These apps are a favorite amongst trekkers and are user-friendly.
Some of them also have features for offline downloads that cover the whole region of the Annapurna Circuit. It makes the apps perfect for spotting teahouses or zooming into junctions.
Digital maps are interactive and updated via crowdsourcing. Likewise, they sync with your phone’s GPS and locate where you are exactly on the map.
But your cell phone’s battery drain is a real issue in high altitudes. Therefore, pack a power bank so that you are not short of charge when you want to use digital maps. And always download an offline map in Kathmandu’s Wi-Fi spots before heading out.
Route Map Image
In recent days, you can find trekking agency websites uploading static trekking route maps in image form. It is a snapshot of a traditional paper map, scanned or created digitally but without any clickable layers or real-time updates.
Such a map gives a bird’s-eye view for those looking to know the region. They are typically high-resolution PNGs or JPGs you can download free of cost. The map image usually includes a simple outline of the route, marked with daily stages, key elevations and icons for stuff like teahouses, viewpoints or rivers.
Digital map images are good for quick references, though they lack depth compared to interactive tools. Refer to the map image of Radiant Treks for the Annapurna Circuit.
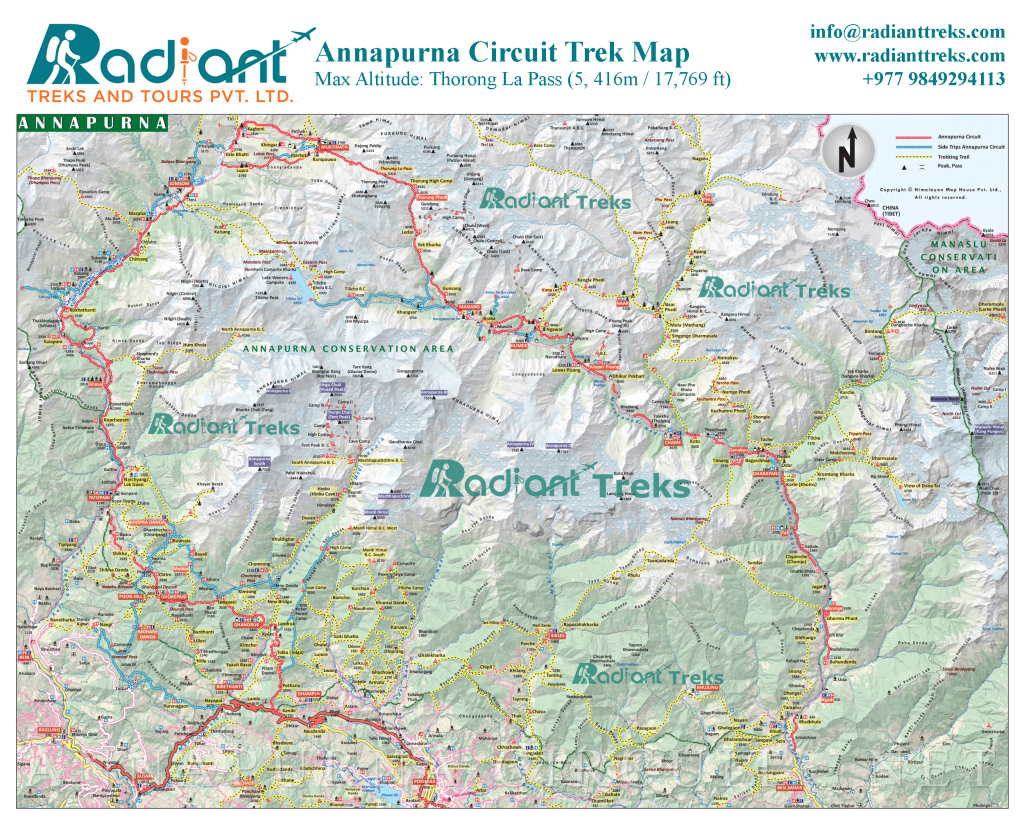
How to Read the Map: Symbols, Legends and Layout
Most maps, whether in print form or digital ones, follow a similar layout. You can see a central panel with the route snaking through, most often on a scale of 1:50,000. Here, 1 cm equals 500 meters. This gives you enough detail to spot individual paths without losing the big picture of that 230 km loop around the Annapurna Massif.
Understanding Features of Print and Digital Maps
- Contours: They are the thin brown lines curving across the map. They are typically spaced every 80-100 meters to show elevation changes and slope steepness. If they are packed closely together, it means you should get ready for a steep ascent. In the trek map, you can see this as the route nears the Thorong La Pass at 5,416 m. The contour lines bunch up tightly, like a warning sign for trekkers.
- Colors: Lush green color marks forests and valleys in the lower Marsyangdi section. Blue color traces the river and streams, like the Kali Gandaki River. Meanwhile, white and gray colors symbolize snowy high areas and glacier peaks, like Annapurna I.
- Icons: It is interesting to read the icons. If you see shapes of little houses in the maps, they indicate teahouses. Viewpoints are usually indicated with eyes or binoculars. Heights of the locations are put in numbers and in meters. The legend is usually put in a corner of the maps and it decodes all icons. It also included scales as well as directions for orientations.
- Elevation Profile: The map also has the elevation profile. It is often a graph inset along the bottom or side of the map. It is like a side-view chart showing altitude and distance.
- Must-know symbols: The trails are dotted for walking and solid for roads. Accommodations are indicated by house icons, often clustered in hubs like Manang. Landmark like Muktinath is represented by the symbol of a temple. Lake icons are used to show Tilicho and other lakes. Shaded areas represent areas with risk of avalanches and that is true especially after the monsoon.
Reading Route Map Image
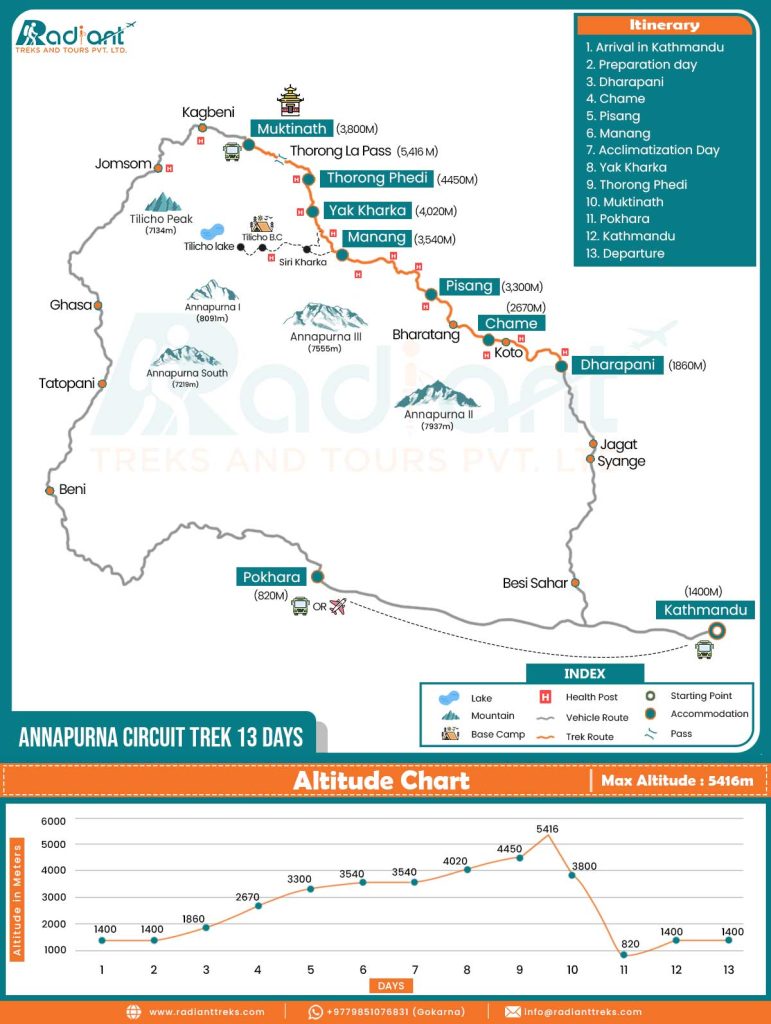
The Annapurna Circuit Trek Map, prepared by the Radiant Treks, shows the 13-day version of the journey with both the geographical trail and the altitude profile. There are indices mentioned along with the map to help you understand the symbols. This simplified version of the map is helpful in planning distance, elevation and acclimatization without being confused about the overwhelming details of the print and digital maps.
Here is an explanation of the route map symbols.
- The starting point of the trek is represented by a blue circle with a white center. In this case, it marks Kathmandu as the official starting point.
- The teal blue circle, bordered by orange color symbolizes the places where accommodation is available.
- The trek route is shown in a solid orange line connecting various locations. This line marks the path you need to follow during the trek.
- The route of the vehicle is depicted as a dashed gray line. It indicates the sections of the route where transportation services are used.
- The two curved parentheses represent a high mountain pass along the route. One of such passes is the Thorong La at 5,416 m.
- The drop icon of blue water is an indicator of the notable lakes along the trail.
- Mountains are shown with the icon of a mountain peak.
- The base camp is marked with a tent icon, indicating the locations of the base camps of different mountains.
- The ‘H’ symbol represents a health post available along the route.
Annapurna Circuit Trek Map: Tracing the Route
The Annapurna Circuit is a counterclockwise loop that starts low and builds to that epic Thorong La Pass before descending. Maps show it divided into stages, with distances and elevations. They also contain key points that help you face during the trek.
Trace it in the following way, based on your itinerary and daily route covered.
Kathmandu (1,400 m)
The first day of the journey kicks off with your arrival in Kathmandu. Picture the map zooming in on this lively capital of Nepal. It is the starting point of your journey.
Drive from Kathmandu to Dharapani (2,670 m)
This part of the journey requires you to hop into a vehicle for a long haul. The map shows a solid line stretching about 394 km from Kathmandu to Dharapani. The drive of nearly 8 hours sets you on the trekking trail. The map also presents roads winding through villages and valleys. Look for forests, waterfalls and suspension bridges dotted on the map.
Trek to Chame (2,670 m)
Trace a nearly 16 km path from Dharapani to Chame on the map in a solid orange line. The nearly 6-hour-long trek route shows altitude markers on the map. Likesie, there is also a healthpost icon at Chame. It is a reassuring sight for trekkers if they are in need of any kind of medical help. Icons representing forests of pine woods, sacred sites like mani walls, and recreational options like hot springs enhance the map’s engagement.
Chame to Pisang (3,300 m)
This leg of the trek follows with the orange line stretching 13.7 km from Chame to Pisang. The map shows mountain peak icons around, teasing the Annapurna range, with the 5- to 6-hour hike etched in the path.
Pisang to Manang (3,540 m)
The orange line is longer in this part, meaning the trek distance and duration are bound to be stretched as compared to the previous day’s trek. It is 17.2 km from Pisang to Manang and can be completed in around 6 hours of ascent. Here, the map adds another ‘H’ icon, indicating the availability of the health post. The temple symbol represents the presence of the Braga monastery in the region, and you can plan to visit this place following your map route.
Manang to Yak Kharka (4,020m)
The map shows a trek route of 10.4 km, from Manang to Yak Kharka. The map’s elevation ticks up here. And a lone accommodation circle in the map marks the stop after a hike of about 5 hours.
Yak Kharka to Thorong Phedi (4,450m)
The trek to Thorong Phedi from Yak Kharka should follow the orange line shown on the map, covering a distance of 7.3 km in about 5 hours. Signs for steep ridges and shaded areas for avalanche zones are shown both on the print and digital maps.
Thorong Phedi to Thorong La Pass (5,416 m) to Muktinath (3,800 m)
This is the tenth day of the trek and it is the centerpiece of the Annapurna Circuit Trek route map. The reason is that the map traces the route to the highest point of the entire trek. The orange line climbs 16.4 km from Thorong Phedi to the prominent mountain pass icon at Thorong La Pass. The trek map then shows the trek route dropping to Muktinath. This stretch of nearly 8 hours includes a temple icon at Muktinath, indicating the presence of the religious monument. Digital and print maps even show markers indicating the arid landscapes of Muktinath.
Drive to Pokhara (822m) from Muktinath
The orange line switches to a dashed gray line, meaning you will travel via vehicular route instead of a trek route. The nearly 8-hour-long route via vehicle ends with a teal blue circle with an orange border on the map. You can also see plane and bus icons reflecting the availability of flight or drive options.
Pokhara to Kathmandu
This leg of the trek marks the twelfth day and loops back with a dashed gray line from Pokhara to Kathmandu. You can complete this part of the journey either by air or by road transportation. And the map clearly indicates that aspect as well.
Tips for Using the Annapurna Circuit Trek Map
Using a trek map is not rocket science, but a few tricks make it an effortless experience. The first thing is to orient the map. That means find the north arrow and align it with a compass. For print, lay it flat and for digital maps, pinch zoom on apps.
Here is a step-by-step process to use a trek map:
- Trace the route before starting the trek. In the process, note elevations for the purpose of acclimatization.
- Check the segments of the trek every day. This will help you follow the best path. For instance, you can choose the upper path from Pisang for the views. And the eye icons on the map denote the viewpoint.
- Always make cross-references of the landmarks while on the trail with the map. It will prevent you from being distracted from the route and reduce the chance of getting lost.
- If you are opting for detours, then follow the New Annapurna Trekking Trail (NATT) lines to skip vehicular roads.
- Rather than depending on one form of map only, you can blend the different types of maps. Use print for evenings and opt for a digital map so as to use GPS for real-time navigation when in fog.
- Routes might change due to road construction as well as natural disasters like landslides. So, stay fresh and use the updated map.
- Get to know alternate trails in case the routes are blocked and you need to switch the path.
- Rely on the mileage and rough timings marked in the map to sketch out your daily routine.
FAQs
Do I really need a map for the Annapurna Circuit Trek?
You must have a map, as it is your key to finding the way during the trek. It figures out altitude changes, which ultimately keeps you safe. It is also important for spotting teahouses or cultural gems along the route.
Which is better – print or digital map?
It depends on what you need. A print map is tough and great for hashing out plans with your crew, while digital maps bring GPS tracking and handy interactive tools to the table.
Can I use GPS apps offline on the Annapurna Circuit?
Yep, you can. Different apps let you download maps ahead of time, so you’re set even without a signal — just get them loaded before you head out.
How do maps help with altitude sickness prevention?
The elevation details on a map let you plan a slow climb and schedule rest days, which is super handy in spots like Manang to help your body adjust.
How do I recognize safety features on the Annapurna Circuit Trek map?
The maps usually have markers for helipads, health posts and emergency escape routes. The gray areas warn you about landslide or avalanche risks.
Are the trek maps updated regularly?
Digital maps tend to stay current, but you need to get the newest version of the print map because there can be updates after the construction of new roads or landslides.
Can I rely solely on image maps?
Image maps give you a nice big-picture view, but they don’t update live or offer interactive help. They are best as a backup to something more detailed.
Where can I get a reliable print map for the Annapurna Circuit?
Check with trekking outfits like Radiant Treks, or pop into Thamel in Kathmandu and pick one up from trusted names.