
Want to avoid the road journey?
We have our standard 15-day Everest Base Camp Trek.
Or choose the shorter and more comfortable experience with the 9-day EBC Trek With Helicopter Return.
You may also opt for the Luxury Everest Base Camp Trek for a premium trek experience.
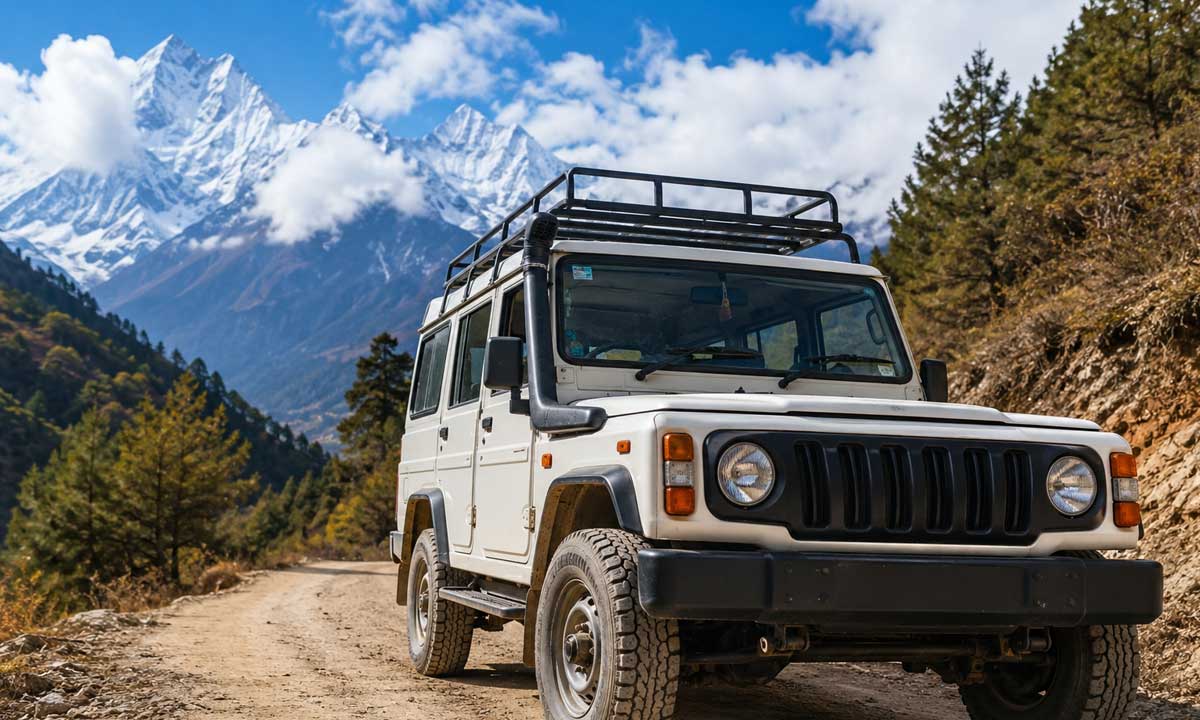
The Everest Base Camp trek by road is the perfect alternative for those trekkers who want to avoid the unpredictable flights to Lukla. By skipping the flight, you are trading a 30-minute plane ride for a full, scenic day of driving from Kathmandu to Salleri and eventually to Surke. It’s a 14-day journey that builds up slowly and connects to the legendary trail leading deep into the Khumbu.
This route is for you if you are trying to dodge flight cancellations, save on travel costs, or want an in-depth look at rural Nepal. As you head toward the summit, you will pass through legendary spots like Phakding, the vibrant Namche Bazaar, Tengboche, Dingboche, and Lobuche. Your trek hits its high point at Everest Base Camp (5,364m) and the famous Kala Patthar (5,545m), offering views that truly have to be seen to be believed.
Unlike the standard flight-in trek, this road-based option feels more like a slow, cultural journey. You will get a real sense of local mountain life away from the busy, tourist-heavy corridors. Expect to cross high suspension bridges, explore quiet Buddhist monasteries, and take in endless views of giants like Lhotse, Nuptse, and Ama Dablam.
While the Everest Base Camp trek without flights is definitely a challenge—usually involving 5 to 8 hours of walking daily—it’s totally achievable for any healthy hiker. With the right prep and our built-in acclimatization days at Namche and Dingboche, you will be ready for the climb.
This route makes the journey feel truly earned, whether you are after a deeper experience or just want to avoid flying. Got questions? Reach out to Radiant Treks—we will handle your dates, customize your itinerary, and sort out every detail of your trek logistics.
Why Book The EBC Trek By Road With Radiant Treks
- Our local guides actually grew up in the Everest region, so they keep you safe while giving you a genuine look into everyday Sherpa life.
- We build our itineraries with plenty of time to acclimatize so you can actually enjoy the hike rather than just surviving the altitude.
- Whether you are flying solo or bringing a group of friends, we can easily tweak the daily schedule to fit exactly how you want to travel.
- We take care of all the stressful logistics like transport, trekking permits, and tea house bookings from the moment you arrive until you head home.
- Taking the road route with our team means you completely avoid the stress of Lukla flight delays and get a quieter, more scenic start to your adventure.
Itinerary Details
Elevation Gain: 990 m / 3,248 ft
Your Everest journey officially begins today—this is the day for a long drive from Kathmandu to Solukhumbu. We will be on the road for a full day, winding through the hills and small villages. This is a fantastic way to ease into the local rhythm before we reach the higher altitudes. It’s a full day on the road, but it’s the best way to see the transition from city life to the quiet, rugged beauty of the mountains.
Leaving Kathmandu early, we will drive through Dhulikhel and Okhaldhunga, alternating between paved highways and rugged dirt tracks. This route gives you a glimpse of rural Nepal that most trekkers flying into Lukla completely miss.
By the time we arrive in Salleri this evening, you will be ready to settle into the local pace and start adjusting to the altitude before the real hiking begins.
Elevation Gain: 220 m / 722 ft
We will grab breakfast in Salleri and hit the road for the drive to Surke. This is a tiny spot just below Lukla. You will get non-stop views of deep valleys and traditional villages along the way. But the rugged mountain tracks mean the drive can take anywhere from four to six hours, depending on the road.
Once we reach Surke, the trek starts. The trail climbs steadily through forests and small hamlets, eventually joining the main EBC route near Chheplung and Ghat. EBC trek without flight allows you to skip the air journey to Lukla, which eventually helps your body adjust to the altitude naturally.
We will finish up in Phakding, a quiet little village right on the Dudh Koshi River. It’s a lovely place to stay at a teahouse and get some rest before we hit the trail again tomorrow.
Elevation Gain: 830 m / 2,723 ft
As we are in Phakding, we have already gotten into the classic EBC trail. Today’s trek into the heart of the Khumbu is challenging, but the effort is worth it. We follow the Dudh Koshi, winding through pine forests and Sherpa villages while crossing several iconic suspension bridges. After passing through the Sagarmatha National Park gates at Monjo, we will grab lunch.
Next, it is time to hike the long, steady trail up to Namche Bazaar. It’s a steep haul that requires a slow, steady pace. Do not forget to keep an eye out—you might catch your first glimpse of Everest from the trail. Eventually, we will reach Namche. It is nestled in the mountains and is a vibrant town where we get time for a well-earned rest.
We are spending the day in Namche to let our bodies settle into the altitude. To help with the process, we will head up to the Hotel Everest View. It is one of the highest hotels on the planet, and the climb helps us get used to the thinner air. But if you are someone looking for a shorter Everest experience, then there is an option to choose the Everest Panorama Trek. It follows a similar route through Namche Bazaar and Hotel Everest View.
The trail climbs through pine forests and opens up to massive views of Everest, Lhotse, Ama Dablam, and Thamserku. We will spend some time soaking in the panorama to help our bodies adjust to the thinner air before dropping back down to Namche for the night.
It’s a short, rewarding hike that sets us up perfectly for the higher altitudes waiting further up the trail.
Elevation Gain: 435 m / 1,427 ft
As we leave Namche, the trail opens up along a beautiful ridgeline. Along the route, you get to see some of the finest mountain views in the Khumbu region. On clear days, Everest, Lhotse, Nuptse, Ama Dablam, and Thamserku remain visible for much of the morning.
After a relatively gentle start, the route descends to the Dudh Koshi River at Phunki Tenga before tackling a steady uphill climb through rhododendron and pine forests.
By afternoon, you will reach Tengboche, home to the region’s most famous Buddhist monastery. Tengboche is easily one of the best spots on the whole trek, with massive Himalayan peaks all around you. It is also the highlight of the Tengboche Trek, a shorter trekking package designed for travelers with limited time. If we have the time, we will head over to the monastery to catch the daily prayer ceremony. After that, it’s back to the teahouse to settle in for the night.
Elevation Gain: 535 m / 1,755 ft
Today, the landscape shifts as we leave the tree line behind and head deep into the high Himalayas. We will drop down through the woods to Debuche, cross the Imja Khola, and pass through Pangboche, an old Sherpa village with a lot of history. Keep your camera ready here; the views of Ama Dablam are incredible. Interestingly, many trekkers tend to extend their adventure with the Ama Dablam Base Camp Trek for closer views of this iconic Himalayan peak.
Past Pangboche, the air gets thinner, and the terrain turns drier as we follow the Imja Valley into Dingboche. It’s a stunning area, surrounded by stone-walled fields and massive peaks. We will be sleeping at 4,410 meters tonight, so this stop is another important spot to let our bodies settle before we push on toward Lobuche and base camp.
Optional Hike: Nangkartshang Peak (5,083 m / 16,677 ft)
Elevation Gain: 673 m / 2,208 ft
This is the second acclimatization day in this itinerary, and we are staying in Dingboche. But instead of just sitting around, we will adhere to the “climb high, sleep low” rule. For that, we will head up toward Nangkartshang Peak.
It’s a bit of a workout, but it’s worth the effort for the views. Once you reach the top, you are looking at an incredible panorama of Lhotse, Ama Dablam, Island Peak, and Makalu. If you’re not up for the full climb, you can take a shorter walk around the valley to raise your heart rate.
The rest of the day is all about taking it easy, drinking plenty of water, and getting ourselves ready for the final push toward Base Camp. It’s a quiet day, but an essential one for keeping us feeling strong and healthy as we head higher.
Elevation Gain: 500 m / 1,640 ft
The scenery gets pretty wild and barren today as we push into the high-altitude zone. We will start with a gradual climb toward Dughla. Here, we will grab lunch before tackling the steep haul up to the Thukla Pass. This part of the trail is sobering. That is because it is home to stone memorials for those who lost their lives in these mountains.
After the pass, the path levels out through a wide glacial valley. You will have giant views of the Khumbu Glacier, Nuptse, and Lobuche Peak the whole way. Since we are getting up there in altitude, we will take it slow and steady. By mid-afternoon, we will have reached Lobuche. It’s a small, chilly settlement, but the energy is different here. The Everest Base Camp is finally just around the corner, and you can feel the excitement building for what’s ahead.
Elevation Gain: 454 m / 1,490 ft
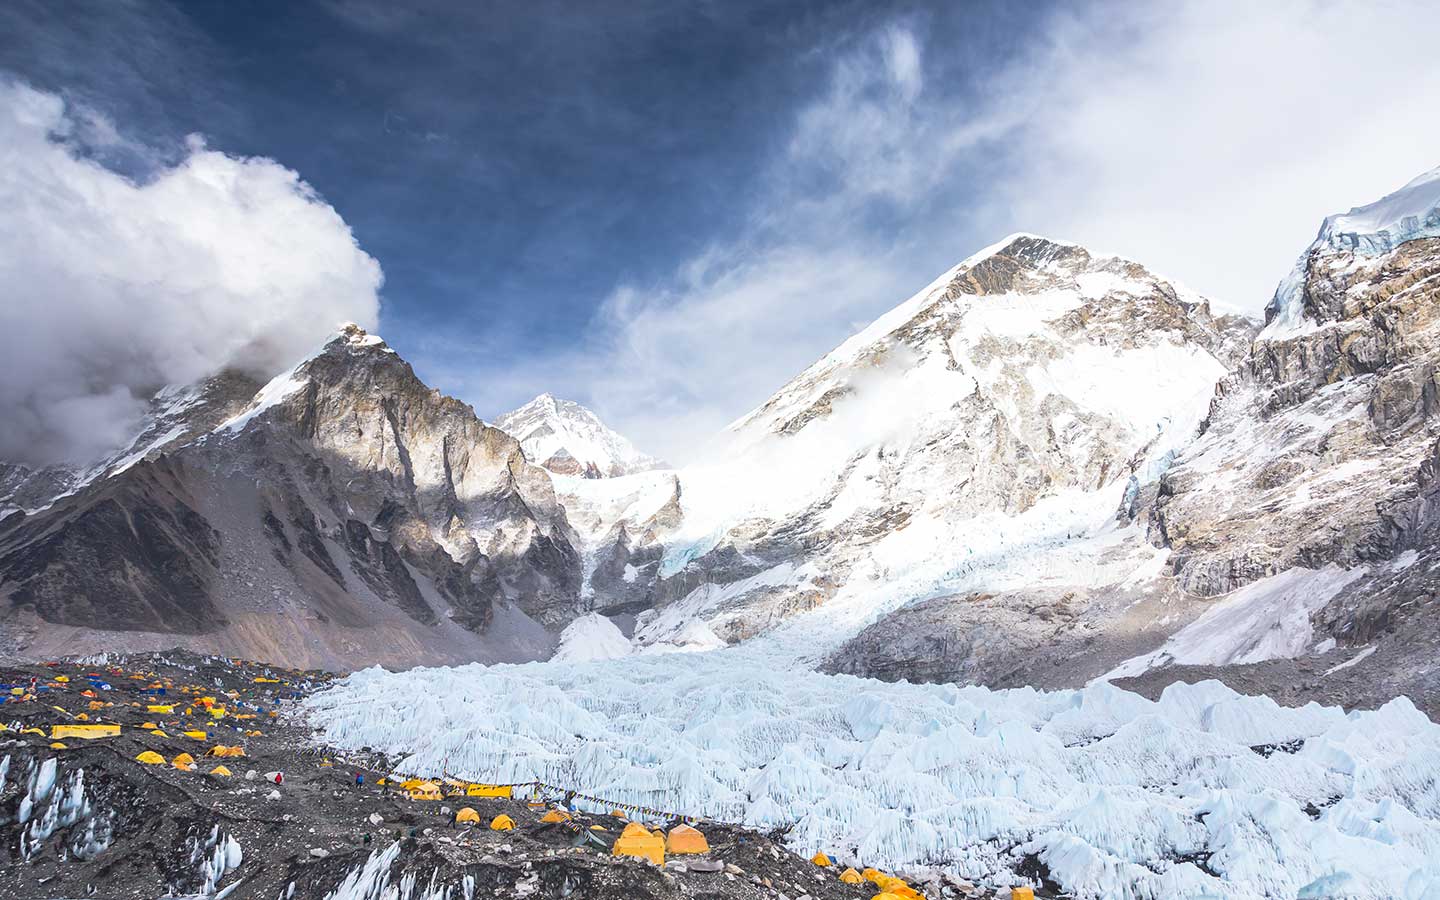
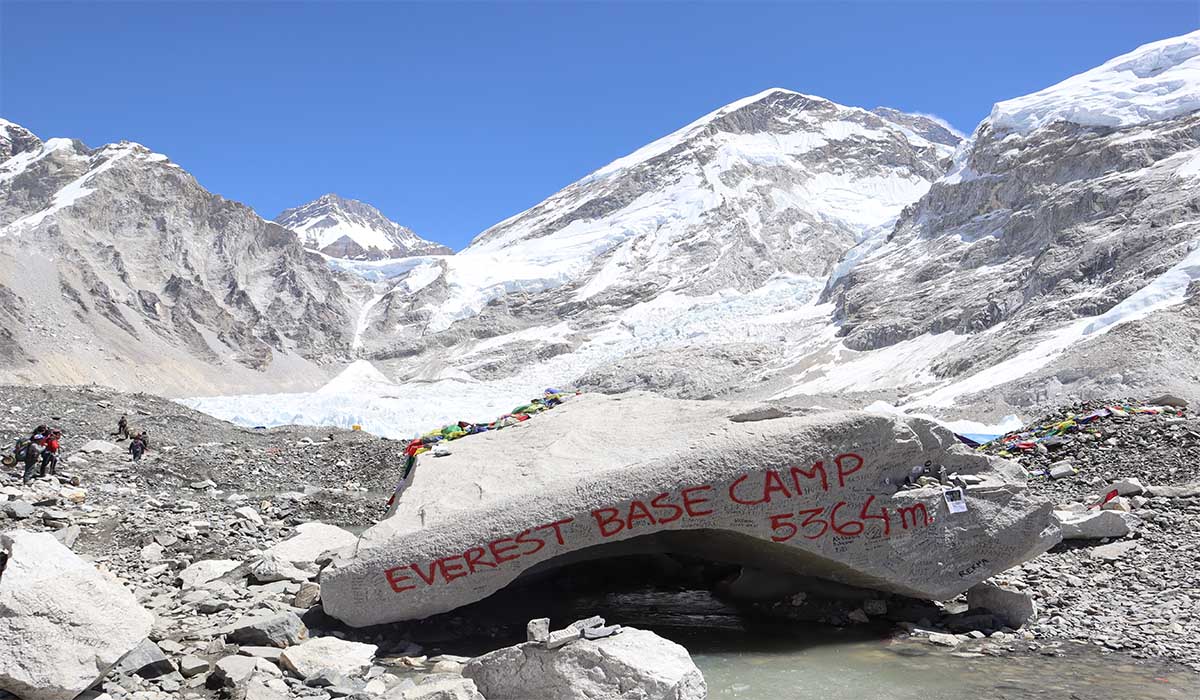
Today, we are finally making it to Everest Base Camp. As such, after an early breakfast, we head out from Lobuche on Day 9. We stick to the edge of the Khumbu Glacier as we make our way to Gorakshep.
The trail gets pretty rocky and rugged from here, and with the air getting so thin, you will definitely feel the effort in every step. After grabbing a quick spot at a teahouse to drop our bags at Gorakshep, we will push on toward Everest Base Camp. For a more challenging variation, many trekkers even combine Everest Base Camp with Cho La Pass and Gokyo Valley.
The trail winds across the glacial moraine until we finally hit the camp at 5,364 meters. You can’t actually see the summit of Everest from here, but standing right next to the Khumbu Icefall, surrounded by the expedition tents and massive peaks, is something else.
After taking it all in and clicking some photos, we will head back to Gorakshep for the overnight stay. It’s a long, tough day, but it’s the moment we have all been working toward.
Elevation Gain: 365 m / 1,197 ft
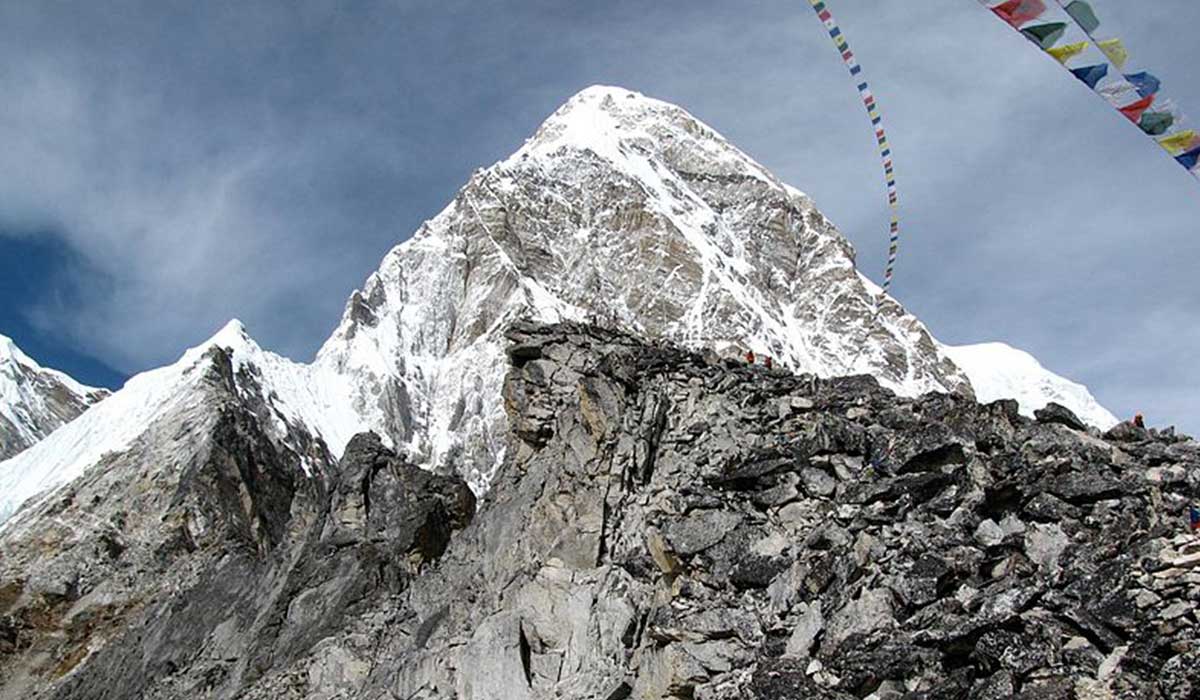
We will be up before sunrise today for the hike to Kala Patthar. It’s the highest point you will hit on the trek. And this is easily the best place to get a clear look at the mountains. The climb is a real grind in the thin air. However, standing up there at Kala Patthar and watching the sun hit Everest, Lhotse, and Nuptse makes the effort worthwhile. Meanwhile, experienced trekkers often continue beyond the standard route on the Everest Three Passes Trek. This is one of the most demanding as well as complete adventures in the Khumbu region.
After heading back to Gorakshep for breakfast, it is time to descend. During the downhill hike, you pass back through Lobuche and push on toward Pheriche. You will notice the difference immediately—the air gets easier to breathe, and the trail starts turning green again. Eventually, we will arrive in Pheriche by the afternoon for a much-needed rest after a couple of pretty intense days.
Elevation Loss: 931 m / 3,055 ft
We are finally heading back down toward Namche today. It feels great to lose some altitude after the last few days. We’ll follow the trail back through Pangboche and Tengboche, walking through those same rhododendron forests and past the monasteries we saw on the way up. It’s mostly downhill, but be prepared for a few sneaky climbs that will still get your heart rate up.
The further we drop, the easier it gets to breathe and the warmer it feels, which is a real relief. By the time we roll into Namche, you will definitely be ready for a hot shower and some real food from the bakery. It’s a long day, but it’s an opportunity to reflect on everything we have just accomplished.
Elevation Loss: 1,150 m / 3,773 ft
Today, we officially start making our way out of the high mountains and heading back toward the lower regions. We will follow the trail down through Monjo and Phakding, winding along the Dudh Koshi River through the pine forests and Sherpa villages we passed on our way up. It’s definitely easier to breathe now that we have lost so much altitude. But don’t underestimate the long walk downhill—it can really wear on your knees. That is why we will just take it slow and steady as we head toward Surke.
Elevation Gain: 70 m / 230 ft
We are saying goodbye to Surke today and hopping in a jeep for the drive over to Salleri. It’s a bit of a rugged journey on mountain roads, but you get some great final views of the terraced hills, quiet Sherpa and Rai villages, and the deep valleys we have been trekking through. The adventure can be quite exciting, depending on the road conditions, which can become very bumpy after rain. Once we get into Salleri, we will just kick back, relax, and get everything sorted for the drive back to Kathmandu tomorrow.
Elevation Loss: 960 m / 3,150 ft
Today is just about getting back to Kathmandu. It’s a long drive—usually 8 to 10 hours on the road—so we’ll be in the public jeep or bus for most of the day. It’s a pretty different vibe from the mountains; you will be winding through rolling hills, farmland, and busy roadside towns that give you a good look at how people live out here in rural Nepal.
Honestly, it’s a good time to just zone out, look out the window, and process the fact that the trek is actually over. By the time we finally pull into Kathmandu, you will be ready for a real bed and a satisfying meal. This marks the end of the adventure, but it’s a nice way to ease back into city life.
Trek Cost Details
Cost Includes
- Bus/Jeep (shared) transfers from Kathmandu to Salleri and back; local jeep from Salleri to Surke and back (private jeep upgrade available with extra cost)
- 13 nights' stay in teahouses or hotels along the trekking route, on a twin-sharing basis
- Full-board meals (breakfast, lunch, and dinner), including one seasonal fruit during the trek and drive
- Experienced and professional guide
- Emergency rescue services included; actual rescue costs must be covered by the trekker or insurer
- Salaries, equipment, and insurance coverage for guides
- Trekking gear: duffel bag, sleeping bag, and down jacket (should be returned to the company after the trek)
- Company-branded T-shirt
- First-aid kit (carried by the guide)
- Trek completion certificate to celebrate your achievement
- Everest Base Camp Trek Permit: Sagarmatha National Park Permit and Khumbu Pasang Lhamu Rural Municipality Entry Permit
- Printed Everest Base Camp Trek route map
- All applicable government taxes and official charges
Cost Excludes
- Porter service at an extra cost of $280 (to be shared among two trekkers)
- Everest Base Camp Trek insurance (look for a policy that covers emergency rescues and high-altitude trekking)
- Personal expenses during the trek, including hot showers, device charging, Wi-Fi
- Drinks of all types (tea, coffee, mineral water, soft drinks, alcoholic drinks, etc.)
- Kathmandu accommodation
- Personal trekking gear and equipment
- Tips for guides and porters
- Sightseeing or guided tours in Kathmandu
- Costs arising from unforeseen circumstances such as extreme
Frequently Asked Questions
Everest Base Camp Trek By Road Overview
If you are planning to do the Everest Base Camp Trek without flight, set aside around 14 days. In this period, you will drive from Kathmandu to Salleri and Surke, trek up to Everest Base Camp and Kala Patthar, then head back the same way. While it definitely adds a few days, the trade-off for the longer travel time compared to flying into Lukla is a much more gradual ascent and a rare chance to really soak in the culture of the lower Solu region.
On the Everest Base Camp trek without flights, you will reach as high as Kala Patthar, sitting at 5,545 meters. While Everest Base Camp itself is a bit lower at 5,364 meters, most people make the extra climb up to Kala Patthar because it offers the best panoramic views of Everest and the surrounding giants. It’s a tough climb, so most hikers head up there early in the morning to catch the sunrise before turning around to start the long trek back down.
The most significant difference is really just how you get to the trail. While most people fly into Lukla to save time in the classic Everest Base Camp trek, the road route—usually via Salleri—starts with a drive from Kathmandu. Sure, you will spend more time in a jeep and walking through the lower foothills, but that’s actually a benefit. It means you are not stressing over flight cancellations, and you get to spend extra days exploring the local culture in quiet villages that most trekkers completely miss. It’s a much more gradual, grounded way to reach the heart of the Everest region.
For many people, the answer is a clear yes. By opting for the Everest Base Camp Trek without flight to Lukla, you completely avoid the 'will-it-or-won't-it-fly' anxiety that ruins so many travel plans. Plus, it’s usually more affordable. Beyond the logistics, you get a much richer, more adventurous experience because you are traveling through remote, beautiful villages that most people just fly right over. If you have the extra time to spare, this overland journey feels way more rewarding and authentic than the standard tourist route.
If you are looking for additional comfort, consider the Luxury Everest Base Camp Trek or the Everest Base Camp Trek with Helicopter Return.
If you prefer traveling overland, have a flexible schedule, or simply want to avoid the anxiety of mountain flight cancellations, this route is a particularly good fit. It’s also a practical choice for budget-conscious trekkers. In addition, those people who want a deeper look at the quieter, rural parts of Nepal that aren't on the typical tourist radar can choose this alternative route. As long as you are physically prepared and have the extra time to enjoy the journey, this trek is a very rewarding way to reach the mountains.
Route & Transportation
You will start by driving from Kathmandu out to Salleri, then continue by jeep as far as Surke. Once you reach Surke, you will join up with the classic Everest trail. From there, the path takes you through all the iconic stops. Like in the traditional EBC trek map, the route follows Phakding, Namche Bazaar, Tengboche, Dingboche, Lobuche, and Gorakshep before finally hitting Everest Base Camp. After you have made the climb up to Kala Patthar for the views, you simply retrace your steps back down to Surke to catch your ride back to Salleri and eventually return to Kathmandu. Alternative routes, such as the Gokyo Valley Trek, branch away from the main trail and explore the western side of the Everest region.
The drive from Kathmandu to Salleri and then on to Surke is somewhat uneven. You will start on decent, paved highways, but as you get deeper into the mountains, things get significantly rougher. Be prepared for bumpy, narrow, and rugged stretches. Because of these factors, travel times depend on the weather and the current state of the road. It can be a long, tiring day, but if you look past the bumps, the views are incredible. You will pass through river valleys, local hillside villages, and rural landscapes that you would completely miss if you were flying straight into Lukla.
They are safe because we arrange your travel in a vehicle with an experienced local driver who knows these mountain roads very well. Nonetheless, Himalayan roads can be challenging, featuring steep climbs, tight corners, and rough, unpaved patches. However, professional drivers here know how to handle the terrain and will always slow down or adjust based on what the weather and the road conditions throw at them. The best way to make sure the trip goes smoothly is if you book through a reputable company, like Radiant Treks, and, of course, avoid trying to drive when the weather turns truly nasty.
There is an option of a local bus or local four-wheel-drive jeeps (shared) between Kathmandu, Salleri, and Surke. These vehicles are well-suited to the rugged mountain roads found in the lower Everest region. You can choose either a shared or private ride, according to the size of your group and the type of package you book. Most people prefer taking a jeep, as it is much better suited for handling those rough, uneven mountain roads than a standard car or a bus.
Yeah, absolutely! Radiant Treks can arrange for it if you want a more personalized experience. It’s a much better way to travel since you can stop for photos whenever you want and skip the hassle of sharing space with strangers. It’s definitely pricier than a shared jeep, but it makes that long haul into the mountains feel a lot less draining.
Sometimes, natural disasters like landslides and heavy rain, together with activities including road construction and rough terrain, can cause delays on the road. Please know that our drivers are locals who know these routes. As such, they will always adjust departure times or take the safest path possible to keep things moving smoothly. We also like to keep our schedules flexible in case something unexpected comes up.
You can actually do the EBC trek via Salleri year-round. Spring and fall give you the absolute best conditions for the roads and trails. Winter gets pretty chilly with some snow here and there. Summer monsoons can make the drive pretty messy and lead to some delays, but honestly, as long as you plan it right, the trail is open no matter the season.
EBC Trek By Road Vs. Lukla Flight
It depends on what you want. If you are short on time and want the quickest way to get started, then flying to Lukla is your best option. But if you are looking to avoid those flight cancellations and Lukla flight diversions, save a bit of money, and actually see more of the landscape along the way, the road route is fantastic. After all, it offers a more immersive experience. Interestingly, both routes lead to the same trail once you reach the lower Khumbu, so you won't miss any of the trekking experience either way!
The trek to EBC by road is almost always more affordable, mostly because you are cutting out the cost of those round-trip Lukla flights. Driving to Salleri or Surke is much cheaper than flying. So, if you want to save money, the road trip is the better option. You will definitely be spending a bit more time on the road, yet most people think it's completely worth it to save that extra cash.
Taking the road is way less stressful because you completely skip the Lukla flight chaos. When spring and fall roll around, those airports get insanely packed, and the weather can change unpredictably, which leads to endless delays and cancellations. Taking a jeep saves you from all that headache, so you are way more likely to actually stick to your schedule without any major hiccups.
Comfort really depends on your preferences. Flying to Lukla is definitely faster, but you are dealing with the stress of potential flight cancellations. On the other hand, the road trip involves long, bumpy hours in a jeep, which isn't for everyone. That said, many trekkers actually find the overland route more comfortable because it’s a more gradual climb, which helps with acclimatization. If you dislike small planes or want to avoid the stress of a weather-dependent flight, the road is the better option—even if it takes a bit longer.
EBC Trek Without Flights: Difficulty
The EBC trek without flights is a moderately challenging journey. You need to be ready for about five to eight hours of walking every day. In addition, the elevation gain is significant during the journey. It’s not necessarily about technical climbing, though; the real test is just the length of the days, the steepness of the trails, and managing the altitude. As long as you are in decent shape, pace yourself properly, and take the time to acclimatize, most people handle it just fine.
You will generally be walking for about five to seven hours a day. It definitely changes depending on the terrain and where you are headed that day, though. If you are pushing for a big summit day—like reaching Everest Base Camp or climbing Kala Patthar—you are looking at a longer haul, usually around seven to eight hours. Your guides will keep things at a steady, manageable pace, which is the best way to help your body handle the altitude and make sure you don't burn out too early.
Definitely not. Most people find the actual push to Base Camp and the hike up to Kala Patthar the next morning way tougher than the road trip. By that point, you are up over 5,000 meters, where the air is super thin. Dealing with the altitude, rocky trails, and long days of walking is what really tests you physically. That said, if you train beforehand, you’ll be fine and get to enjoy the most incredible views of the whole trip.
Training & Fitness
You don’t have to be a professional athlete to do the trek, but you should be the kind of person who is comfortable being on their feet for five to eight hours a day, several days in a row. Because you are dealing with long, steep climbs, uneven rocky paths, and the thin air at higher altitudes, even a relatively short walk can feel quite taxing. If you already have a habit of hiking, climbing stairs, or keeping up with cardio, you will be in great shape to handle the trail.
Absolutely, plenty of first-timers make it to Everest Base Camp by road every single year. You don’t need a lot of experience to do this trek. What really matters is showing up with a decent baseline of fitness, picking an itinerary that doesn't rush you, and actually giving your body the time it needs to adjust to the altitude. If you pace yourself, prepare well, and just listen to what your guide tells you, you will be far better off than someone who has done a number of treks but ignores the basics.
It’s actually pretty common to see people in their 50s, 60s, and even 70s trekking to Base Camp. Honestly, your age is way less important than how you are feeling physically and your mindset. If you stay active, train beforehand, and don’t rush the altitude adjustment, there’s no reason you can’t do it. But it is always wise to consult your doctor and get approval before being a part of this trek.
Try to start getting ready a couple of months before you head out. Focus on cardio—hiking, running, cycling, or just hitting the stairs. These are necessary aspects of endurance training and will build your stamina. Please keep in mind squats and lunges—they keep you strong on the trail. If you can, go for a few hikes with a weighted backpack to get used to the feel. Just remember, it’s not about speed; it’s about building stamina so you can stay on your feet for long days on the trail.
For that last month before the trek, stop worrying about trying to get super intense with your workouts and just stay consistent. Definitely make sure your boots are fully broken in—you don’t want blisters on the trail. Furthermore, take a moment to double-check your gear. Aside from that, just focus on staying hydrated and getting plenty of rest. The most important thing is to avoid cramming all your training into these last few weeks; you will feel much better if you have been doing steady work all along.
Group Size & Suitability
There is no perfect size. That said, a group of two to eight people usually hits the sweet spot—you get the fun of the social side, but it’s still small enough to be flexible and get plenty of personal attention. With a smaller group, it’s much easier to stick to a pace that works for everyone and make adjustments if someone needs a little extra help. You can definitely do it solo or in a big group, too. But most people find that having just a few others along makes the experience much better.
Going solo on the EBC trek by road is absolutely doable and can be a pretty wonderful experience. Because it’s such a popular route, you’ll never really feel isolated. You will be passing through plenty of villages and running into other hikers all day long, especially during the main trekking seasons. Many people actually prefer going solo because it gives them the freedom to enjoy the surroundings at their own speed.
The Everest region is widely considered one of the safest spots to hike in Nepal. Every year, plenty of women head out there to trek, whether they are going solo or joining a group. As long as you book with a solid, reputable company, like Radiant Treks, bring a guide along, and use the same basic street smarts you would when traveling anywhere else, you will be fine. The local folks in the mountain villages see hikers from all over the world constantly, and they are known for being incredibly welcoming and respectful.
It’s definitely doable with kids, provided they are older, active, and actually enjoy spending time outdoors. The terrain isn't the problem—the altitude is the real hurdle. You have to be willing to go slow and prioritize acclimatization above everything else. You really can’t afford to push them if they start feeling off or fatigued. If you are seriously considering it, just sit down with an experienced guide to walk through your plan before you lock anything in. They will be able to help you figure out an itinerary that’s safe and realistic for your family.
Altitude Sickness & Acclimatization
Altitude sickness is a reality for many on the trek to Everest Base Camp. While it doesn't affect everyone, most trekkers encounter some mild symptoms as they gain elevation. The risk generally begins to climb once you pass 3,000 meters and becomes a serious factor after leaving Dingboche.
Acute Mountain Sickness (AMS) usually starts with a nagging headache, dizziness, fatigue, nausea, appetite loss, or trouble sleeping. It doesn’t matter how fit you are; it can affect anyone. If you are feeling off, tell your guide immediately. Catching these signs early is key to dealing with them before altitude sickness turns into something serious.
If you are heading up into the mountains, the most important thing you can do is just pace yourself. Even if you feel energized when you first arrive, resist the urge to rush. Make sure you are actually utilizing those built-in acclimatization days in places like Namche and Dingboche. They aren’t just filler; they are essential for helping you adapt. Beyond that, keep things simple: stay hydrated, keep up with your meals, and skip the alcohol.
In this case, our guides are trained to spot the danger signs early, and they will decide on the best plan of action immediately. They decide whether helping the person walk down to a lower village is enough or, if it’s serious, whether they need to call in a helicopter. We prioritize getting them to safety as quickly as possible.
Yes, helicopters are available and are the primary option for serious medical emergencies throughout the Everest region. They are capable of reaching most of the main villages, like Pheriche, Dingboche, Lobuche, and Gorkakshep, as long as there’s a safe spot to land.
Just a heads-up, though—these flights are incredibly expensive. Because of that, we cannot stress enough how important it is to have travel insurance that specifically covers helicopter rescue before you even set foot on the trail.
Best Time, Weather, & Temperature
For the road journey of the EBC trek, aim for either spring (March to May) or autumn (September to November). These two windows are the gold standard for EBC Trek without flight for a reason—the weather is usually pretty stable, the temperatures are actually comfortable for hiking, and the views are just unbeatable. Plus, the roads and trails are in the best shape during these months, which makes the whole trip run a lot smoother.
The weather in the Everest region can be tricky because it shifts so much with the season and altitude. While the mountain weather is famously unpredictable, having a general idea of what to expect helps you pack and plan properly. Basically, you are looking at four seasons, each with its distinct features:
Everest Region: Seasonal Weather Breakdown
| Season | What To Expect |
| Spring (March, April, May) | • Temperature: Mild, usually 10°C to 15°C during the day, but expect it to drop below freezing once the sun goes down. • Weather: This season is a trekkers’ favorite for a reason. The weather is generally stable, the skies stay clear for those classic mountain views, and you get to see the lower trails bloom with rhododendrons. |
| Summer/Monsoon (June, July, August) | • Temperature: Warmer, often reaching 15°C to 20°C. • Weather: This is the time of year when the rains really set in, so you are looking at a lot of cloud cover, regular downpours, and trails that can get pretty muddy. Views of the peaks can be hit-or-miss because of persistent cloud cover, which makes this period less ideal for scenery. |
| Autumn (September, October, November) | • Temperature: Crisp and cool, typically 5°C to 15°C during the day. • Weather: Often considered the "gold standard" for trekking. After the monsoon rains wash everything clean, the air feels incredibly fresh, and the visibility is at its absolute best for the entire year. |
| Winter (December, January, February) | • Temperature: Freezing, often dipping to -10°C or way lower at night. • Weather: It’s bright and sunny, but the wind chill can be brutal. You’ll definitely deal with snow on the higher paths, and keep in mind that some of the high-altitude teahouses close up for the season because of the extreme cold. |
Since the weather can change quickly, the best approach is to be prepared for a bit of everything, regardless of when you go. It's all part of the Himalayan experience!
You really can’t go wrong with either, but they do have their own distinct vibes. If you are someone who wants those crystal-clear, "postcard" mountain views, autumn is usually the winner. The sky is just incredibly sharp and crisp. On the other hand, if you prefer greener scenery and want to stay a little warmer, spring is a particularly lovely time to visit, especially when the rhododendron forests are in full bloom. It really depends on whether you prioritize perfect visibility or a slightly warmer, more colorful landscape.
Yes, the trek is possible during winter. That is because from December to February, the trails are quieter, and the mountain views can be spectacular. However, temperatures become much colder in the winter season, especially around Lobuche, Gorakshep, and Kala Patthar. In addition, snow and ice can also make some sections more challenging. However, it is not impossible for experienced trekkers. Remember to pack some serious cold-weather gear for the winter trek—it’s the only way to keep yourself comfortable out there.
Yes, but the monsoon trek comes with some real challenges. As you travel by road, heavy rain can affect the roads from Kathmandu to Salleri and Surke. Floods and landslides can block them. Likewise, rain can make lower trekking trails muddy and slippery. Clouds often hide mountain views. The advantage is that there are fewer trekkers on the route. Those trekking during the monsoon should expect occasional delays and variable weather.
October is generally the best time for clear views. The monsoon rains have finished, the air is clean, and you get excellent, sharp visibility of Everest and the surrounding peaks. November is a good choice, too. Spring is beautiful, but you will often deal with clouds building up by the afternoon.
Weather plays a huge role in your trip. Heavy rain can slow down the drive between Kathmandu, Salleri, and Surke, while snow makes higher trails tricky. Storms also leave paths slippery and block the views. The best approach is to keep your schedule flexible, so you have a buffer for unexpected delays.
Accommodation
You will be staying in local teahouses throughout the trek. They are basically just simple, family-run lodges. The rooms are pretty basic—just twin beds, a mattress, and some blankets. But honestly, it’s a super cozy way to experience the mountains. Just keep in mind that the higher you go, the simpler things get. These teahouses are more than just a place to crash; they’re the heart of the trek, where you can eat, warm up, and hang out with other hikers.
You can usually get a private room in most villages, especially early on in places like Phakding or Namche. Just keep in mind that once you get higher up—or if it's peak season—things get a lot tighter, and private rooms aren't always guaranteed. It’s definitely worth asking for one in advance if it’s a priority for you. But be prepared for the reality that sometimes you will have to share, especially in the more remote spots.
They vary by location and altitude. Lower villages often have western-style toilets. But higher settlements most commonly use squat toilets. Most facilities are shared rather than private. Although they are generally clean, conditions become more basic as you move toward Everest Base Camp. So, carrying personal toiletries and hand sanitizer is always a good idea.
You can usually get a hot shower in most teahouses. But it's going to cost you a few extra bucks. How nice a shower is—and whether you can get one—depends on the village and the time of year you trek. Once you start getting high up near Base Camp, hot water becomes a real luxury, so expect it to be harder to come by and a bit pricier.
Yeah, you should definitely bring your sleeping bag. Teahouses will give you blankets, but they are not always enough once you start getting into the higher altitudes, where it gets freezing at night. Having your bag—especially one rated for sub-zero temps—is a total game changer for staying warm. It actually helps in getting some sleep, especially when you hit places like Lobuche or Gorakshep.
Food & Drink
Teahouses offer a surprisingly varied menu, including dal bhat, noodles, fried rice, soups, pasta, potatoes, eggs, pancakes, and some bakery items. Food choices are generally more extensive in lower villages and become simpler at higher elevations. Most trekkers discover that there is plenty of variety to keep them well-fed throughout the trek.
Dal bhat is essentially the gold standard for hikers out here, and there’s a reason it’s the go-to meal for everyone on the trail. It’s got all the right stuff—plenty of carbs and protein—to keep you powered up and moving through those long, grueling days. Plus, the mix of rice, lentils, and veggies is super easy on your stomach. This is a huge plus when you are at a high altitude. The best part? Most places will give you free refills, so it’s the best value on the entire trail.
You won't have any trouble finding vegetarian food anywhere along the route. Vegan options are definitely doable in most teahouses, though the menu gets a lot simpler the higher you go. Just let your guide and the kitchen staff know what you need, and they will do their best to keep you well-fed.
Don't drink the tap water unless you have treated it first—it's just not worth the risk of getting sick. Most people either pay for boiled water at the teahouses or bring their own purification tablets or filters to treat the water they collect. Staying hydrated is the most important thing you can do to handle the altitude, so just bring a reusable bottle and a good way to purify your water, and you will be fine.
There are a few easy ways to keep your water safe. You can use purification tablets, a portable filter, a UV light, or just buy boiled water from the teahouses as you go. Honestly, many people combine two of these methods just to be extra safe. Plus, sticking with a reusable bottle and your own purification kit is a great way to help keep the Everest region a little cleaner by cutting down on plastic waste.
When you are trekking at high altitude, you should avoid alcohol and heavy fried foods. Do not eat any meat that doesn't look fully cooked. Alcohol is a bad idea because it dehydrates you. It also makes it harder for your body to adjust to the thin air. Greasy and heavy meals can upset your digestion when you are already feeling the effects of the altitude. Instead, stick to simple, fresh food and keep sipping on water, tea, or soup to stay hydrated.
Beyond just the standard dal bhat, there’s a whole lot of local food you have got to try. Things like Sherpa stew, Tibetan bread, momo, and thukpa are staples in most of the teahouses. And honestly, they are delicious. Anything made with local potatoes is usually a winner, too. Digging into these local dishes is one of the best parts of the whole trek. It is a fantastic way to get a real taste of the Himalayan culture.
Cost & Budget
The trek by road is usually cheaper simply because you are skipping those expensive flights to Lukla. Driving from Kathmandu to Salleri and Surke costs less than flying, so you end up saving a good chunk of change. You still get to see all the same sights—Everest Base Camp, Kala Patthar, and everything else—just with a more budget-friendly start to the trip.
Radiant Treks' package for the road-based EBC trek covers the basics like your ground transport, teahouse stays, three meals a day, your permits, and a professional guide. On top of that, we provide gear like a sleeping bag, a down jacket, and a duffel bag to use for the trip. Just make sure to double-check exactly what’s included in your package before you book so there are no surprises when you get here.
You will have to pay for a few things out of pocket, so it’s good to be prepared. Radiant Treks does not include travel insurance, international flights, tips for your guide and team, or personal snacks or drinks. You will also need to budget extra for "on-the-trail" costs like hot showers, charging your devices, or using WiFi at the teahouses. And if you happen to get stuck in a hotel for an extra night because of a schedule change or a delay, that’s usually on you, too.
Having around USD 300 to USD 600 worth of Nepali rupees is enough to cover all your personal spending. You will want that cash for small expenses, such as buying extra snacks and paying for hot showers. It is also essential for charging your phone, using the Wi-Fi, and, of course, tipping your guide and porters at the end.
Yes, they are. But the case is pretty tricky. That is because the ATMs on the trail are either super unreliable or non-existent once you get past Namche Bazaar. That is why make sure you take out cash in Kathmandu before you start your journey. So, you won’t have to worry if the ATMs don’t work.
Prices for these things vary by location and altitude. Generally, a hot shower will run you about USD 3 to USD 8. And plugging in your devices to charge usually costs between USD 2 and USD 5 per attempt. If you are looking to get on the Wi-Fi, expect to pay anywhere from USD 3 to USD 10. The higher you go, the harder it is for locals to get electricity and supplies. So, prices naturally rise the further you get into the mountains.
There’s no formal rule for tipping, but it’s really the standard way to show your crew you appreciate everything they did for you. A good way to figure it out is to set aside about 10-15 percent of your total trip cost and split that between your guide and the porters at the end. Since you might not find any way to pay digitally, just make sure you have enough cash in Nepali rupees.
You need to be ready for some surprise costs when you’re out there. Things like weather delays can force you to stay an extra hotel night, and all those little convenience fees for Wi-Fi, hot showers, and charging your phone really add up faster than you would think. Between those, plus extra snacks, drinks, or even an unplanned porter hire, it’s easy to spend more than you budgeted. Always keep a bit of extra cash on hand as a buffer—it will save you a lot of stress if things don't go exactly as planned.
Trek Permits
You will need the Sagarmatha National Park Entry Permit and the Khumbu Pasang Lhamu Rural Municipality Permit. Every single trekker heading into the region has to have these, regardless of whether you fly into Lukla or take the road route. The good news is you usually don't have to worry about the paperwork. Radiant Treks will handle it all for you before you set off.
Plan for around USD 45 to USD 55 per person for the national park and local municipality fees. If you book a guided trek, your package price usually includes these fees. So, you won’t have to handle them while on the trail.
We can handle your permits. It is available at the Nepal Tourism Board office in Kathmandu, or even at certain checkpoints along the way. You can let us deal with all the paperwork. It saves you a lot of hassle as we sort out everything properly before you arrive in the Everest region.
Guide & Porter
You really need a guide for this trek, and honestly, current rules in the region pretty much make it mandatory anyway. A guide is also your best friend out there. They take care of navigation, arrange your teahouses, and monitor your health at high altitudes. Especially on the longer road-based route, having someone local who knows the way makes the whole trip much safer and a lot less stressful.
Your guide keeps everything running smoothly so you can just enjoy the trek. They will handle all the daily planning, help you stay on course, and support your adjustment to the altitude. Beyond that, they will sort out your meals and rooms, share local stories, and coordinate help if you ever need it. Their expertise on those high-altitude days is invaluable for pacing yourself safely.
You don't have to hire a porter, but once at a higher elevation, you will be glad that you did. They will carry the bulk of your heavy gear, which means you are just walking with a light daypack. Since the overland trek involves some pretty long, tiring days, shedding that extra weight makes a massive difference in how you feel. This also helps you save your energy for the big climbs ahead.
Basically, a porter is just there to carry your heavy gear from one teahouse to the next. A porter-guide, on the other hand, has two roles. They carry your bags and help you with the route and basic logistics. They aren’t as qualified as a lead guide. However, if you are an experienced trekker looking to save money while still having some support, they are a good option.
Packing & Gear
The secret to staying comfortable on the trail is definitely layering. You will want moisture-wicking base layers, some fleeces, and reliable waterproofs. Also, a solid down jacket is necessary when you get higher up. Down in the lower villages, the days are pretty mild. But once you hit places like Lobuche, Gorakshep, and Kala Patthar, it gets freezing fast. So, don't skimp on the warm gloves and heavy-duty gear for those final stretches.
You will want a pair of waterproof boots that offer ankle support and a really good grip. The trail is a mix of rocky paths, stone steps, loose gravel, and occasionally a bit of snow or ice up high. The biggest thing, though, is to make sure you break them in well before you leave. Never start a trek like this in brand-new boots—you will end up with nasty blisters that turn a fantastic walk into a painful chore.
You don’t strictly have to bring them, but you will definitely be glad you did. Trekking poles are a huge help for keeping your balance. They really take the pressure off your knees during those long, steep climbs and descents. You will especially appreciate having them on the way back when you are navigating the long downhill stretches between Namche, Phakding, and Surke. They just make the whole experience a lot easier on your body.
You will definitely want to pack your smartphone, camera, a power bank, charging cables, a headlamp, and a universal travel adapter. A high-capacity power bank is a total lifesaver because charging stations get noticeably pricier the higher up you go. Also, if you are a photography enthusiast, bring spare batteries. The cold mountain air drains battery life incredibly fast.
Pack your own kit with essentials like your personal medicines, blister plasters, painkillers, rehydration salts, cold medicine, antiseptic, and water purification tablets. If you are thinking about bringing altitude medicines, just be sure to check in with your doctor first. Your guide will have a first-aid kit. But it is best to keep your own go-to supplies in your pack so you don’t have to wait for what you need.
If you are hiring a porter, aim to keep your daypack around five to eight kilos. It should really only hold the essentials. Carry things like your water, an extra layer, some snacks, your valuables, and your important documents. Keeping it light is always a wise move.
The biggest traps people fall into are packing way too much stuff they never end up using. Breaking in brand-new boots on the trail is another mistake. Also, it can be totally underestimating how freezing it can get up high. Many folks also drag along far too many electronics. Just keep it practical, layer up, and pack as light as you can—your back and feet will thank you.
Communication & Connectivity
You can definitely find Wi-Fi in a lot of the teahouses, even in spots like Namche, Dingboche, and Lobuche. Just keep in mind that it’s often pretty slow and can be super spotty if the weather turns nasty. Most places charge extra, and prices rise the higher you go. Don't expect blazing quick speeds!
You will find that both NTC and Ncell have service throughout the Everest region. But NTC is usually the better option if you want to stay connected at higher altitudes. That said, don't rely on it too heavily. It is because signal strength jumps around a lot depending on where you are. The weather might also affect it. You will have a decent enough connection in the lower areas. But as you get closer to Base Camp, the service often becomes patchy.
For the most part, yes, you can charge your devices in almost every village. Teahouses will let you plug in your phone, camera, or power bank. But they usually charge a small fee for it. And the price tends to go up the higher you climb. It’s still super smart to pack a reliable power bank as a backup.
You can get online out there, but you shouldn't expect it to be very reliable. The speed varies a lot depending on where you are. It is also affected by the weather and how many other people are trying to use it. The lower villages usually have a much better connection than the places higher up. You should expect the signals to drop out from time to time.
Trek Safety
Yes, this route is generally pretty safe as long as you are prepared. You will be sticking to well-trodden paths through bustling villages, so you will rarely be far from help. The real challenges are altitude, weather, and physical fatigue—not technical climbing. Sticking to a smart itinerary and listening to your guide keeps the trip very safe.
The big ones are altitude sickness, freezing weather, slipping on rough trails, dehydration, and sudden changes in the weather. Long days of hiking up high will also wear you out fast. The good news is you can dodge most of these headaches just by pacing yourself and drinking tons of water. Furthermore, pack the right gear and take your time to adjust to the altitude.
You will find basic health posts and clinics in a few of the larger villages, like Namche Bazaar and Pheriche. If things get serious, then a helicopter rescue can be arranged. Plus, if you trek with an experienced guide, they can spot emergencies and take action to help you.
You will definitely want a policy that specifically covers high-altitude trekking up to at least 6,000 meters. This should include emergency helicopter evacuation. Standard travel insurance usually won't cover high-altitude stuff. Thus, double-check the fine print before you fly to Nepal for this trek.
Cultural Experience & Responsible Trekking
Everest Base Camp Trek without flight to Lukla means you actually get to walk through tons of quiet, lower Solu villages. You end up hanging out with locals, seeing real farm life up close, and experiencing genuine Sherpa and Rai cultures. It’s just a way more raw, authentic look at everyday mountain life before you hit the busier tourist paths.
You will pass some incredible Buddhist monasteries on this route. Tengboche is the most famous, mostly because of its deep spiritual vibe and killer mountain backdrop. You can also check out Pangboche—one of the oldest in the Khumbu. Likewise, there are a few smaller village gompas that give you a real feel for local mountain culture.
Up in the Everest region, the local Sherpas celebrate some really beautiful Buddhist festivals throughout the year. The biggest one is Mani Rimdu over at Tengboche Monastery. It’s amazing to watch monks wear traditional masks and do these energetic dances. You also have Dumje and Lhosar (the Tibetan New Year). If you time your trek right, observing one of these feels super special.
Minimizing waste is one of these ways. Furthermore, carry reusable water bottles and avoid single-use plastics. In addition, one should also dispose of rubbish in a responsible manner. Sticking to the main trails is important to stop soil erosion and protect delicate mountain plants. In addition, give wildlife their space so as to keep the Everest region beautiful for the future.
Booking The Trek
To get everything in place, you should plan to book this trip at least a few months in advance. That is true, especially if you are targeting the busy spring or fall seasons. Radiant Treks asks for a 20 percent deposit that is non-refundable. It lets us book your guesthouses, sort out permits, and organize your travel before you even land in Nepal.
Yes, it is possible to do the last-minute bookings. However, the trek is not guaranteed in such cases. Spots fill up really fast during peak season. That is why you can only lock in a booking if the permits, transport, guides, and teahouses are actually available. Nonetheless, it is always best to book as early as you can.
Life happens, so if you ever need to cancel your trek, just inform us with a written notice. That initial 20 percent deposit is non-refundable. But if you have paid in full and have to back out within seven days of your start date, there's a 30 percent cancellation fee. We usually process refunds within five working days. Please note that any standard bank or transaction fees may be deducted.
Things come up, so totally—if your plans change, you can push your trip back. If an emergency happens, we can usually just postpone instead of doing a full cancellation. You will just have to cover whatever costs we have already paid. You should also cover the price difference between your old dates and the new ones
Booking the trip is super straightforward. You can secure your spot with a 20 percent deposit. And you can pay by credit card via WeTravel or a direct transfer to Himalayan Bank. For the rest of the balance, you can pay it in full when booking the trek. Or you may just wait and pay the remaining amount when you arrive in Kathmandu before we head out.
Everest Base Camp Trek By Road Packing List
Packing for the road route to Everest Base Camp isn’t about stuffing your bag with everything you own—it’s about packing smart. You will be trekking from the relatively mild lower hills of Solukhumbu all the way up to 5,500 meters, and the weather can flip all of a sudden. A clever packing strategy keeps you warm, comfortable, and ready for anything without overloading your pack.
Clothing
The absolute secret to staying comfortable up in the Everest region is layering. You will experience a freezing morning, a sweaty afternoon, and a cold night all in the same day.
Base Layers (2-3 Sets)
These sit right against your skin and manage your body heat and sweat.
What To Pack
- Thermal tops: You will practically live in these during chilly mornings, cold evenings, and the higher-altitude stretches.
- Thermal bottoms: Slip these under your trekking pants for a much-needed layer of warmth, especially when hanging out at night.
- Moisture-wicking t-shirts: Cotton is your enemy here. Bring shirts that pull sweat away from your skin and dry fast.
- Quick-drying underwear: Go for lightweight, breathable pairs that you can easily wash and dry overnight in your room.
- Sports bras (for female trekkers): You’ll be on the trail for hours, so pack options that give you great support but still let your skin breathe.
Mid Layers (2-3 Sets)
This is your insulation layer. You wear these to trap your body heat when the temperature drops.
What To Pack
- Fleece jacket: It keeps you super warm, yet it does not take up much space in your daypack.
- Lightweight insulated jacket: Your go-to for tea breaks, cool mornings, and just chilling in the teahouse dining room.
- Wool sweater or pullover: It is a total lifesaver on those freezing days when your fleece just isn’t enough to keep the chill out.
- Long-sleeve trekking shirt: It is essential to keep the intense high-altitude sun off your arms while adding a comfortable, light layer of warmth.
Outer Layers
This is your shield against wind, rain, and the occasional snow flurry.
What To Pack
- Waterproof trekking jacket: Do not skip this. It’s an absolute lifesaver when unexpected rain or snow rolls in.
- Waterproof trekking pants: You’ll be glad you have these when you hit wet weather or biting winds higher up.
- Windproof shell layer: The Himalayan winds, especially once you get past Namche Bazaar, are no joke. A good shell is the best option.
- Rain poncho or rain cover: An essential backup to throw over yourself and your gear if it rains.
Down Jackets
Once you get up high, temperatures easily plummet below freezing, especially before the sun comes up and right after it sets.
What To Pack
- Heavy down jacket: You will absolutely need this for freezing spots like Lobuche, Gorakshep, and the early morning hike up Kala Patthar.
- Lightweight down jacket: Great for layering lower down on the trail or throwing on during a chilly evening indoors.
Trekking Shirts and Pants
This outfit is what you’ll actually be hiking in most of the time.
What To Pack
- Quick-dry trekking shirts (3-4): Comfortable, light, and simple to rinse out in the sink if needed.
- Trekking pants (2-3 pairs): Look for something durable but stretchy so you can move easily over rocks and steps.
- Convertible zip-off pants: Incredibly practical when the morning freeze turns into afternoon heat.
- Lightweight shorts: Nice to have for the warmer, lower-elevation days at the start and end of your trek.
Head and Hand Protection
You lose a ton of body heat from your head and hands, so keeping them covered is non-negotiable.
Headwear
They are needed to keep the upper body warm and comfortable.
What To Pack
- Warm beanie or wool hat: Pull this on during cold mornings, evenings, and even while sleeping if it’s freezing.
- Sun hat or trekking cap: The UV rays at high altitudes are intense. Protect your face and scalp.
- Buff or neck gaiter: It is incredibly versatile, letting you easily block the biting wind, keep your neck warm, or pull it over your mouth to filter out pesky trail dust.
- Balaclava: You will absolutely want to pack it if you are braving a winter trek or planning to hike up to those freezing summit viewpoints before the sun comes up.
Gloves
Pack them if you want warm and functioning hands during the trek.
What To Pack
- Lightweight inner gloves: Perfect for walking on cool mornings when you just need a little something over your hands.
- Insulated waterproof gloves: Essential for the really cold, windy days higher up on the mountain.
- Hand warmers: Totally optional, but you will feel like a genius for bringing them on a winter trek.
Footwear
Your feet are doing all the hard work to get you to Base Camp. Treat them right!
Trekking Boots
They are mandatory items among the footwear in your packing list. Make sure you get the right pairs for your trek.
What To Pack
- Waterproof trekking boots: Keep your feet dry through mud, snow, and shallow streams while giving you a comfortable ride.
- Ankle-supporting boots: The trails get incredibly rocky and uneven; good ankle support saves you from rolling an ankle and ending your trip early.
- Deep-grip soles: You want boots with good traction so you aren’t slipping and sliding on loose dirt or wet rocks.
Camp Footwear
You will need a good pair of footwear even wen you are not trekking — during your stay in the teahouses.
What To Pack
- Lightweight sandals: You can wear them after taking your heavy boots off at the end of the day—it is the best feeling in the world.
- Camp shoes or sneakers: Something comfortable to pad around the teahouse in during the cold evenings.
Socks
They keep your feet warm and also prevent blisters by adding softness to your skin.
What To Pack
- Trekking socks (4-5 pairs): Get good quality, moisture-wicking ones to keep your feet dry and stop blisters before they start.
- Warm wool socks (2-3 pairs): Save these exclusively for sleeping or lounging in the freezing teahouse dining rooms.
- Liner socks: Optional, but wearing them under your thick socks is a great trick for preventing blister-causing friction.
Winter Accessories
If trekking in the winter season, then you must bring these items for a safe and comfortable trek to EBC without flights.
What To Pack
- Microspikes or light crampons: If you’re going during the colder months, these are amazing for walking safely over icy patches on the trail.
Bags and Storage
Keeping your stuff organized means you won’t be tearing your bag apart looking for dry socks in the dark.
What To Pack
- Duffel bag (80-100L): If you have a porter, this is what they will carry. It holds the bulk of your clothes and sleeping gear.
- Daypack (30-40L): You carry this. Fill it with your water, snacks, camera, rain jacket, and anything else you need while actively walking.
- Backpack rain cover: Slips right over your daypack to keep your daily essentials dry if it starts pouring.
- Dry bags: Perfect for organizing your clothes and making absolutely sure your electronics and sleeping gear don’t get wet.
- Zip-lock bags: Cheap and incredibly useful for grouping small items, cash, toilet paper, or important papers.
Sleeping Gear
Teahouses do give you blankets, but they rarely wash them and usually don’t keep you warm higher up. Bring your own gear.
Sleeping Essentials
For a good night’s sleep, it is necessary that you have all those items required for the same.
What To Pack
- Sleeping bag (-10°C or lower): The rooms up high are unheated and get cold at night. A good bag is your best friend.
- Sleeping bag liner: Adds a few extra degrees of warmth and keeps your actual sleeping bag clean from sweat and dirt.
- Travel pillow: Totally optional, but teahouse pillows can be a bit hit-or-miss, so bringing your own is a real luxury.
- Earplugs: Teahouse walls are basically paper. If someone is snoring three rooms down, you’re going to hear it.
Toiletries and Personal Care
Showers are rare and cost extra the higher you go, so basic hygiene is mostly a DIY affair.
Essential Toiletries
They are the basics of your daily live and are a must-have during thre trek.
What To Pack
- Toothbrush and toothpaste: The absolute basics to feel somewhat human every morning.
- Biodegradable soap: Better for the mountain environment when you do get a chance to wash up.
- Hand sanitizer: You will use this product constantly before meals and after bathroom breaks since soap and running water aren’t always available.
- Wet wipes: Essentially your “mountain shower” for most of the trek. Bring plenty.
- Toilet paper: Buy it in Kathmandu. It gets ridiculously expensive to buy on the trail, and teahouses don’t provide it.
- Quick-dry towel: Packs down tiny and actually dries out in the cold air before you have to pack it again.
- Lip balm: The air up there is incredibly dry and windy; cracked lips are painful and annoying.
- Moisturizer: Slather this on your face and hands to keep the wind from ruining your skin.
- Sunscreen (SPF 50+): At high altitudes, there is less atmosphere to block the sun. You will burn fast if you aren’t careful.
First Aid and Personal Medication
Your guide will have a basic kit, but you should absolutely have your own personal stash of meds.
Medical Essentials
This is the most important thing to carry in your backpack.
What To Pack
- Prescription medications: Bring more than enough to last your whole trip, just in case of delays.
- Diamox: Talk to your doctor first, but this is the go-to medication for helping your body adjust to the altitude.
- Paracetamol or Ibuprofen: Lifesavers for those altitude headaches or sore leg muscles at the end of the day.
- Oral rehydration salts: Putting these in your water bottle helps replace all the electrolytes you sweat out.
- Cold and flu medication: The “Khumbu Cough” is a real thing. Lozenges and cold meds will help you sleep.
- Anti-diarrheal medicine: Stomach bugs happen. Have this on hand just so a bad stomach doesn’t ruin your trek.
- Blister treatment kit: Moleskin or Compeed blister pads are vital. Treat hot spots the second you feel them.
- Antiseptic cream: Good for keeping tiny scrapes or cuts from getting infected in the dirt.
- Pulse oximeter: Optional (your guide will usually have one), but good to have if you want to check your oxygen levels.
Hydration and Trail Snacks
Drinking enough water is literally one of the best ways to fight off altitude sickness, and snacks keep your morale high.
Hydration Equipment
It is essential to stay hydrated as well as to get clean drinking water.
What To Pack
- Reusable water bottles: Bring a couple of sturdy bottles. You can fill them with boiling water at night to act as a bed warmer.
- Hydration bladder: Super convenient for sipping while you walk, though the tube can freeze at higher altitudes.
- Water purification tablets: Bring these tablets to purify tap or stream water so it is safe to drink.
- Portable water filter or Steripen: Another excellent way to treat your water quickly and cut down on plastic waste.
- Insulated thermos: Hot tea or warm water on a freezing morning trail makes a big difference.
Recommended Snacks
Snacks are a source of quick energy, and they also satiate your sweet tooth.
What To Pack
- Energy bars: Easy to eat while walking when you need a fast hit of calories.
- Protein bars: They are especially beneficial for muscle recovery and they keep you full between teahouse meals.
- Trail mix: Salty, sweet, and doesn’t weigh much.
- Chocolate: Because everything is better with chocolate, especially when you are feeling a little worn out.
- Electrolyte powders: Mix these into your water to keep your hydration levels up and replace what you sweat out.
Electronics and Accessories
Batteries drain incredibly fast in the cold, and charging costs money, so plan accordingly.
Essential Electronics
They are essential for capturing those photo moments, staying in touch, and charging devices.
What To Pack
- Smartphone: For snapping photos, checking maps, and letting your loved ones know you are doing great when you get Wi-Fi.
- Camera: If you want higher-quality shots of those mountain peaks.
- Power bank: Bring a hefty one (20,000mAh+). Charging at teahouses gets expensive the further up you go.
- Charging cables: Sounds obvious, but they are so easy to forget on your nightstand at home.
- Universal adapter: Nepal uses a few different plug types, so a universal one saves you the headache.
- Headlamp: You will definitely need this device for reading in bed, middle-of-the-night bathroom runs, and early morning hikes.
- Spare batteries and memory cards: Keep your spare batteries inside your sleeping bag at night so the cold doesn’t zap them.
Trekking Accessories
They add to your comfort level when you are trekking and during your stay at teahouses.
What To Pack
- Trekking poles: They save your knees on the endless downhill hikes
- Sunglasses with UV protection: Snow blindness is a real threat. Bring good, wraparound sunglasses to block the glare.
- Watch: Great for keeping track of your pace and knowing how long until lunch.
- Travel journal or book: You actually get a lot of downtime in the afternoons. Having something to read or write in is a nice way to unwind.
- Pocket knife: Always handy for slicing an apple, opening a stubborn snack wrapper, or fixing gear.
Important Documents and Cash
You can’t just swipe a credit card on the side of a mountain, so get your paperwork and cash sorted in Kathmandu.
Required Documents
Do not forget to bring these documents, or you may be in serious trouble.
What To Pack
- Passport: You literally can’t get your permits or pass checkpoints without it.
- Passport photocopies: Always smart to have a backup stashed in a different bag just in case.
- Nepal visa copy: Good to have printed out for any administrative hurdles.
- Travel insurance documents: Make sure your policy explicitly covers trekking up to 6,000 meters and helicopter evacuation.
- Passport-size photographs: You sometimes need these for local SIM cards or random permit checks.
- Emergency contact information: Write it down on actual paper and keep it easily accessible.
Cash for Personal Expenses
ATMs basically don’t exist once you leave Namche Bazaar, and the ones there are notoriously empty. Bring Nepali Rupees.
Recommended Budget
Plan to bring around NPR 20,000 to 30,000 to cover extra trail comforts.
Final Packing Advice
When you are packing for the road route to Everest Base Camp, always choose practicality over quantity. Seriously, nobody cares if you wear the same shirt three days in a row. Focus on smart layering, breaking in your footwear before you arrive, and bringing just the essentials rather than hoarding “just in case” items. The lighter your backpack is, the more you are actually going to enjoy the incredible views around you!
Real Stories from our TripAdvisor Page
Curious about what travelers say about Radiant Treks? Discover genuine experiences on our Reviews Page.


