An Annapurna Circuit map helps trekkers understand three things before they start walking: how the route connects village to village, where elevation changes become serious, and which sections still follow old foot trails instead of jeep roads. The full circuit usually covers somewhere between 160 and 230 kilometers, depending on where you begin walking and where you leave the trail. The highest point is Thorong La Pass at 5,416 meters.
Maps matter more during the trek to the Annapurna Circuit now than they did 20 years ago. Road construction has changed parts of the lower route, several alternate trails exist above the main road, and digital GPS apps sometimes show shortcuts that are not always the best walking option. A good Annapurna Circuit route map makes it easier to understand daily distances, acclimatization gaps, side trails, and where the terrain changes from the green Marshyangdi Valley into the dry upper section near Muktinath and the Kali Gandaki Valley.
Most trekkers use a mix of printed trail maps and offline GPS apps. The paper version is still useful in teahouses at night when planning the next day’s walk. GPS maps help more during unclear junctions, especially near jeep roads or upper trail variations around Pisang and Manang.
Annapurna Circuit Route Overview
The Annapurna Circuit follows a broad counterclockwise route around the Annapurna range in central Nepal. Most modern itineraries begin with a drive into the lower Marshyangdi Valley and gradually climb north toward Thorong La Pass before descending into the drier landscape near Muktinath and the Kali Gandaki Valley.
Where The Annapurna Circuit Starts And Ends
Older versions of the trek started much lower, often from Besisahar. Today, many trekkers begin farther up the road network in villages like Dharapani to avoid long stretches affected by jeep traffic. The ending point also varies. Some finish in Jomsom and fly or drive out, while others continue farther south toward Tatopani or Ghorepani. And Radiant Treks’ itinerary has the descending hike up to Muktinath before driving out to Pokhara.
That variation is one reason Annapurna Circuit maps rarely show exactly the same total distance. The route is almost always walked counterclockwise. Ascending gradually through Manang gives the body more time to adjust before crossing Thorong La. Doing the circuit in reverse compresses altitude gain too quickly and is far less common.
Total Distance Of The Annapurna Circuit
The full Annapurna Circuit generally ranges between 160 and 230 kilometers, depending on the following factors:
- Road access used at the beginning
- Side trips included
- Exit point after Muktinath
- Use of vehicles around Jomsom or Tatopani
Trekkers who include side routes like the Tilicho Lake trek with the Annapurna Circuit will add extra walking distance and acclimatization days. Shorter itineraries usually remove lower road sections rather than cutting the high mountain portion near Thorong La.
One thing that surprises first-time trekkers is how uneven the distances feel. A 10-kilometer day above 4,000 meters can feel longer than a 20-kilometer walk lower in the valley.
Highest Point On The Route
The highest point on the Annapurna Circuit is Thorong La Pass at 5,416 meters. Most trekkers cross the pass early in the morning from Thorong Phedi or High Camp before descending toward Muktinath. On the map, this section usually appears as the steepest elevation spike of the entire circuit.
The altitude matters more than the raw distance here. The climb itself is not technically difficult in normal conditions, but thin air slows the pace noticeably above 5,000 meters. Even short map segments can take several hours during the pass-crossing day.
Download Annapurna Circuit Map PDF
Annapurna Circuit Map With Major Villages
Most Annapurna Circuit maps are organized around the main settlement chain running through the valley system. These villages are more than overnight stops. They help trekkers judge elevation gain, food availability, acclimatization pacing, and route progress.
Some villages sit only a few walking hours apart on the map but feel very different on the ground because of altitude, terrain, or exposure to wind.
Main Villages in Route Order
| Village & Elevation | Route Notes |
|---|---|
| Dharapani (1,860 m) | Common modern starting point after the road journey |
| Chame (2,670 m) | Larger settlement with lodges, shops, and permit checkpoints |
| Upper Pisang (3,300 m) | Main split between upper and lower trail variations |
| Manang (3,540 m) | Primary acclimatization stop before higher elevation |
| Yak Kharka (4,020 m) | Terrain becomes drier and more exposed above this point |
| Thorong Phedi (4,450 m) | Final overnight stop before crossing Thorong La Pass |
| Muktinath (3,800 m) | Pilgrimage settlement reached after the pass crossing |
| Jomsom (2,720 m) | Major transport hub in the Kali Gandaki Valley |
The spacing between villages changes as the trek climbs higher. Lower sections through the Marshyangdi Valley have relatively frequent settlements, while the upper stretch beyond Manang feels more spread out. That difference becomes important during adverse weather or altitude fatigue.
Where the Route Changes Most Geographically
One reason the Annapurna Circuit still stands apart from many Nepal treks is how dramatically the terrain changes across the route.
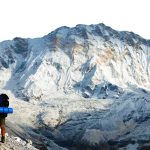
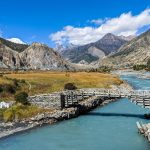
The lower trail follows the greener side of the Marshyangdi Valley. Maps here show forests, river crossings, waterfalls, and tightly packed contour lines along steep valley walls. Villages like Chame and Pisang sit in this transitional middle section where pine forests gradually start thinning out.
Beyond Manang, the map begins to look noticeably different. The terrain opens up, vegetation becomes sparse, and the route enters the dry rain shadow zone north of the Annapurna range. This is also where elevation spacing on the map starts demanding closer attention because villages become smaller and weather exposure increases.
After crossing Thorong La Pass, the descent toward Muktinath and Kali Gandaki Valley feels almost like entering another trekking region entirely. The greener valley system disappears, replaced by wider brown slopes, wind-carved terrain, and much drier river corridors.
Annapurna Circuit Elevation Map Explained
The elevation profile of the Annapurna Circuit matters more than the raw trekking distance. Most route maps show a gradual climb through the lower valleys, followed by a sharper altitude gain beyond Manang before the crossing of Thorong La Pass.
Trekkers often underestimate how different a short high-altitude day feels compared to longer walks lower on the trail. A 10- to 12-kilometer section above 4,000 meters can easily take longer than a 20-kilometer day near the start of the circuit.
Elevation Gain by Section
The lower section between Dharapani and Chame gains altitude steadily but usually feels manageable because the trail remains lower and oxygen levels are still relatively comfortable. Most maps show tightly packed river valleys here, with frequent ascents and descents between suspension bridges and hillside villages.
The climb becomes more noticeable after Pisang. Upper trail variations gain elevation faster, especially on the route toward Manang. This section is also where many elevation maps begin highlighting acclimatization zones more clearly.
Above Manang, the profile changes again. Villages become farther apart, vegetation thins out, and the elevation graph steepens toward Yak Kharka and Thorong Phedi. The final ascent to Thorong La is usually the sharpest point on the entire elevation map.
Where Altitude Feels Most Noticeable
First, many trekkers begin noticing altitude effects around Manang, even though the route has already climbed gradually for several days. Sleep often becomes lighter here, and uphill sections start feeling slower than the map distance suggests.
The stretch between Yak Kharka and Thorong Phedi feels harder than it looks on paper. The terrain itself is not especially technical, but thinner air changes pacing quickly above 4,000 meters.
Crossing Thorong La Pass usually starts before sunrise. On most maps, the distance from Thorong Phedi to the pass appears relatively short. In reality, cold temperatures, darkness, snow conditions, and altitude slow movement considerably.
Why Elevation Profiles Matter More Than Daily Distance
Many first-time trekkers focus too heavily on daily kilometers while planning the Annapurna Circuit. Elevation maps tell a more useful story.
A short stage with a steep altitude gain can require far more effort than a longer valley walk. Trail conditions also matter. Loose rock, snow, jeep roads, and exposed traverses affect walking speed more than distance alone.
That is why it is good if your Annapurna Circuit trail map includes the following things:
- Distance between villages
- Elevation change between overnight stops
Looking at only one of those numbers rarely gives an accurate sense of the day ahead.
Annapurna Circuit Trail Map and Navigation
The modern Annapurna Circuit is no longer a single uninterrupted walking trail. Road construction, alternate footpaths, and side routes have made navigation more layered than many older guidebooks suggest. Most trekkers still follow the same general corridor, but the exact walking line often changes from one itinerary to another.
That is why current Annapurna Circuit trail maps usually separate jeep roads, classic trekking trails, and newer New Annapurna Trekking Trails (NATT) alternatives.
Understanding The Main Trail
Most of the route follows the traditional valley system through the Marshyangdi Valley before crossing Thorong La Pass and descending into the Kali Gandaki Valley.
In lower sections, trekkers often choose between the following:
- Jeep road routes
- Older stone walking trails
- NATT (New Annapurna Trekking Trails)
The NATT routes were developed partly to avoid dusty road sections after vehicle access expanded deeper into the circuit. On many printed maps, these trails appear as separate lines running above the main road.
Around Pisang, the route commonly splits into upper and lower trail options. The upper trail gains more elevation but usually feels quieter and more scenic. Many trekkers also prefer it for acclimatization before reaching Manang.
Areas Where Trekkers Commonly Get Confused
One of the most common navigation mistakes happens in lower road sections where jeep tracks and walking trails intersect repeatedly. Painted trail signs are not always consistent, and they tend to change or disappear, especially after road expansion or landslide rerouting.
The Upper Pisang and Lower Pisang split also causes confusion for trekkers using older Annapurna Circuit route maps. Some maps show both routes clearly, while others emphasize only the lower road-connected section.
Above Manang, route finding becomes simpler overall because the valley narrows toward Thorong La. Still, snow can temporarily obscure parts of the trail near the pass during poor weather.
The climb between Thorong Phedi and High Camp often looks easier on the map than it feels on the ground. The distance is short, but the elevation gain is steep enough that many trekkers underestimate the time needed.
Offline GPS vs Printed Maps
| Map Type | Best Use |
|---|---|
| Printed trail map | Planning stages, reading overall route geography, backup navigation |
| Maps.me | Simple offline trekking navigation with live GPS location |
| Gaia GPS | Detailed terrain and elevation tracking |
| OsmAnd | Offline route navigation with customizable map layers |
Digital maps work well for live positioning near trail junctions or road crossings. Still, many trekkers carry a printed Annapurna Circuit map as backup because phone batteries drain quickly in cold conditions, especially above 4,000 meters. As such, you may not be able to refer to digital maps when the phone is not working.
How to Read the Map: Symbols, Legends and Layout
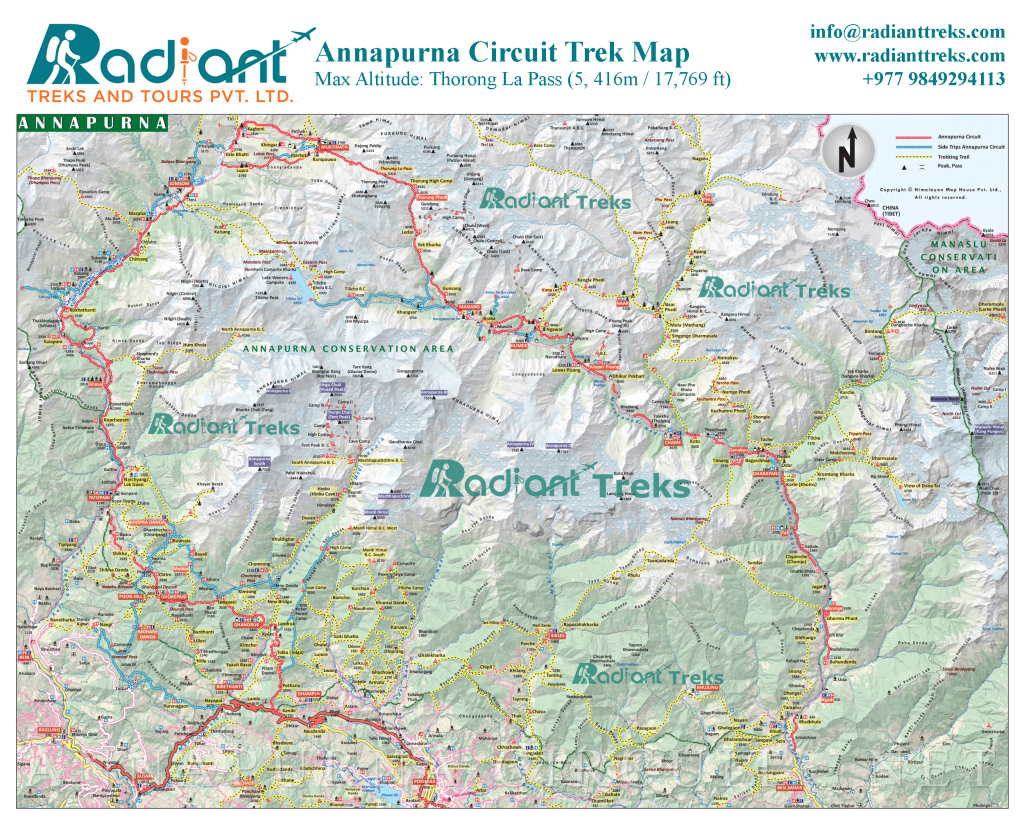
Most maps, whether in print form or digital ones, follow a similar layout. You can see a central panel with the route snaking through, most often on a scale of 1:50,000. Here, 1 cm equals 500 meters. This scale gives you enough detail to follow village trails and elevation changes without losing the broader route overview around the Annapurna region.
Understanding Features of Print and Digital Maps
- Contours: They are the thin brown lines curving across the map. They are typically spaced every 80-100 meters to show elevation changes and slope steepness. If they are packed closely together, the climb is usually steeper. In the trek map, you can see this as the route nears the Thorong La Pass at 5,416 m. The contour lines tighten sharply around the pass, showing one of the steepest sections of the circuit.
- Colors: Lush green color marks the forests and valleys in the lower Marsyangdi Valley section. Blue color traces the river and streams, like the Kali Gandaki Valley river system. Meanwhile, white and gray colors symbolize snowy high areas and glacier peaks, like Annapurna I.
- Icons: Small house symbols usually indicate teahouses or accommodation areas. Viewpoints are often marked with eyes or binocular icons. Heights of the locations are generally shown in meters. The legend, usually placed in a corner of the map, explains symbols, scales, and route orientation.
- Elevation Profile: The map also has an elevation profile, which is often shown as a graph along the bottom or side of the map. It provides a side view of altitude gain and distance across the route, making it easier to understand where acclimatization becomes more important.
- Must-know symbols: Trails are often dotted for walking routes and solid for roads. Accommodation is indicated by house icons, often clustered in hubs like Manang. Landmarks like Muktinath are represented with temple symbols. Lake icons are used for destinations such as Tilicho Lake. Shaded areas usually represent avalanche or landslide risk zones, especially after the monsoon season.
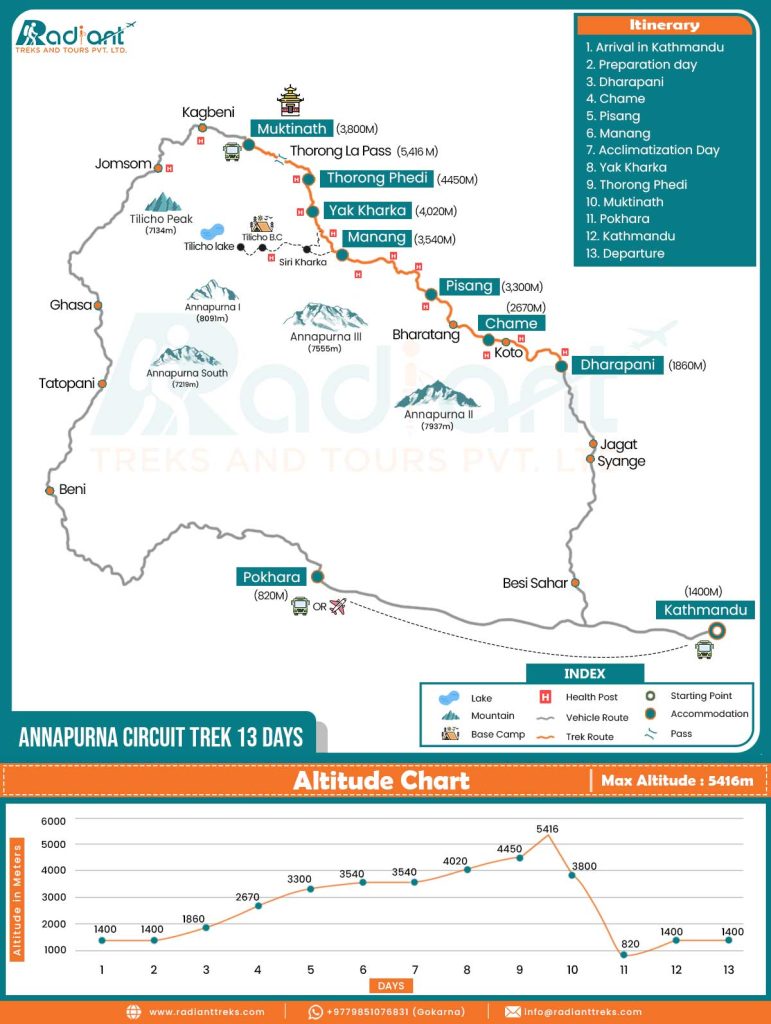
Reading Route Map Image
The Annapurna Circuit map, prepared by Radiant Treks, shows the 13-day version of the journey with both the trekking route and the elevation profile. There are indices mentioned along with the map to help you understand the symbols. This simplified map format is useful for quickly understanding distance, elevation, and overnight stops without the heavier detail of full topographic maps.
Here is an explanation of the route map symbols.
- The starting point of the trek is represented by a blue circle with a white center. In this case, it marks Kathmandu as the official starting point.
- The teal blue circle, bordered by orange color, symbolizes the places where accommodation is available.
- The trek route is shown in a solid orange line connecting different locations along the circuit.
- The vehicle route is depicted with a dashed gray line, marking the sections where buses or jeeps are commonly used.
- The curved parenthesis-style symbol represents a high mountain pass, including Thorong La Pass at 5,416 m.
- Blue water drop icons indicate lakes and water bodies along the trail.
- Mountains are shown with peak icons.
- Base camps are represented with tent symbols.
- The ‘H’ symbol marks health posts or medical points along the route.
Annapurna Circuit Map By Daily Stages: Tracing The Route
The Annapurna Circuit route stays broadly the same, but the walking days can shift depending on where you start, where you stop, and whether you take acclimatization or side-trip days along the way. Most Annapurna Circuit maps divide the trail into village-to-village stages, making it easier to follow elevation gain, walking hours, and route progression.
Kathmandu (1,400 m) To Dharapani (1,860 m)
The journey begins with a long drive from Kathmandu into the lower Marshyangdi Valley. Many trekkers now start walking from Dharapani instead of lower trailheads because road access has extended deeper into the region.
Most route maps show the area as a road section rather than a trekking segment.
Dharapani (1,860 m) To Chame (2,670 m)
This section follows forested trails, suspension bridges, and river valleys toward Chame. The elevation gain is steady but usually manageable in the early days of the trek.
Maps in this section often show multiple trail variations where walking paths briefly separate from the jeep road before reconnecting further ahead.
Chame (2,670 m) To Manang (3,540 m)
The route climbs gradually through Pisang before reaching Manang at 3,540 meters. Most trekkers take the upper trail from Pisang because it avoids more of the road and helps with acclimatization.
Route maps usually show both upper and lower options clearly in this section.
The landscape also begins changing noticeably here, with forests thinning and the valley becoming drier approaching Manang.
Manang (3,540 m) to Thorong Phedi (4,450 m)
Beyond Manang, the landscape starts opening up and the villages thin out quickly. The trail passes through Yak Kharka before reaching Thorong Phedi, the last main stop below Thorong La Pass.
This part of the Annapurna Circuit elevation map often looks deceptively short. In reality, altitude slows the pace considerably above 4,000 meters.
Thorong La Pass (5,416 m) to Muktinath (3,800 m)
The crossing of Thorong La Pass is usually the longest and most demanding day of the circuit. Most trekkers leave before sunrise from Thorong Phedi or High Camp and descend afterward toward Muktinath.
Maps often show this section as the steepest elevation transition of the trek. Snow, wind, and cold temperatures can make the crossing feel much slower than the map distance suggests.
Muktinath (3,800 m) To Pokhara (822 m)
After Muktinath, the route descends into the Kali Gandaki Valley toward Pokhara. Some trekkers continue walking south through the valley, while others drive or fly out from Jomsom. Modern Annapurna Circuit route maps usually show both trekking and vehicle alternatives in this section because road access now reaches much farther into the valley than before.
Tilicho Lake Extension On The Annapurna Circuit Map
Many Annapurna Circuit maps also show the side route to Tilicho Lake, one of the most common extensions added to the circuit.
The trail branches off near Khangsar before reconnecting with the main route toward Yak Kharka and Thorong La Pass. On most maps, this detour appears as a separate spur west of Manang.
The detour adds extra walking days and higher elevation exposure, especially near Tilicho Base Camp. Trail conditions in this section can also change quickly after snowfall or landslides, especially during the late monsoon and early winter months. So, updated maps become more useful here than in the lower parts of the circuit.
Best Annapurna Circuit Maps And Apps
Most trekkers carry both a paper map and an offline phone map on the Annapurna Circuit. The paper version helps for checking the wider route at the end of the day, while GPS apps are more practical around road sections and unclear junctions.
Best Printed Maps
Printed Annapurna Circuit Trek maps are easy to find in Kathmandu, especially in Thamel. Most of these maps include the following details:
- Village elevations
- Trail lines
- Side routes
- Contour markings
- Pass crossings
Many trekkers still prefer paper maps in the higher villages because charging points become less dependable farther up the trail.
Best Offline Navigation Apps
The apps most commonly used on the Annapurna Circuit include the following:
- Maps.me
- Gaia GPS
- OsmAnd
Maps.me works well for basic navigation. Gaia GPS gives more terrain detail, while OsmAnd is useful for offline route tracking.
Most trekkers download the maps before leaving Kathmandu or Pokhara.
What To Download Before The Trek
Before starting the trek, it helps if you download and save the given thing on your phone:
- Offline route maps
- Elevation details
- Accommodation points
- Emergency locations
- Side trails like Tilicho Lake
Mobile signal becomes patchy in the upper sections beyond Manang, so offline access matters more than many first-time trekkers expect.
Common Map Mistakes On The Annapurna Circuit
Many trekkers look at the Annapurna Circuit map and assume the trail will be straightforward the whole way. Some sections are. Others are less obvious once jeep roads, side trails, and weather come into play.
A few mistakes come up again and again. They are:
- Paying attention to kilometers but ignoring altitude
- Following the road when the walking trail branches off above it
- Thinking the Thorong La crossing looks shorter on the map than it actually feels
- Carrying an older printed map that does not show newer road sections
- Missing the upper route near Pisang
- Forgetting to download offline maps before leaving Kathmandu or Pokhara
- Expecting phone signal all the way beyond Manang
The biggest surprise for many first-time trekkers is the road situation. Older Annapurna Circuit maps show a much more continuous walking trail. Now, parts of the lower route weave in and out of jeep tracks, which is why many trekkers use the higher NATT trails where possible.
Frequently Asked Questions (FAQs)
Why Do Different Annapurna Circuit Maps Show Different Distances?
The total distance changes depending on where the trek begins and ends. Some itineraries start walking from Dharapani, while others begin lower down. Side trips like Tilicho Lake also add extra distance.
Does The Annapurna Circuit Still Follow The Original Trail?
Not entirely. Road construction has changed parts of the lower route, especially below Manang. Many trekkers now use the higher NATT trails to avoid jeep roads where possible.
Which Section Of The Route Is Hardest To Judge On The Map?
The climb from Thorong Phedi to Thorong La Pass often looks shorter on the map than it feels on the ground. Altitude slows the pace much more than many first-time trekkers expect.
Are Offline Maps Reliable On The Annapurna Circuit?
Offline GPS apps work well on most of the route when you download the maps beforehand. Signal becomes unreliable in some higher sections, so trekkers usually save maps before leaving Kathmandu or Pokhara.
What Is The Most Common Navigation Mistake On The Annapurna Circuit?
A common mistake is following the jeep road when the main walking trail branches away from it. This usually happens in the lower parts of the circuit, where the walking trail keeps cutting away from the jeep road and joining it again farther ahead.
Is A Printed Annapurna Circuit Map Still Useful?
Yes. Many trekkers still carry one. It is easier to spread out on a table at the teahouse and look at the next day’s route than constantly zooming in and out on a phone.